OpenArk Compiler
1. Maple IR前端
Maple IR是方舟编译器的中间表示语言,设计原则是尽可能多的保留源文件的信息,其中信息包括声明部分(符号表)和代码部分。Maple IR是平台无关的,不依赖任何处理器。Maple IR也有配套的Maple VM,可以直接运行Maple IR。可以利用不同的前端将C/C++,Java等不同的语言转化成Maple IR,也可以扩展支持别的语言。
Maple IR支持所有已知的程序分析和优化操作,它支持在不同语义层面表示程序代码,也就是说,不同于LLVM IR的显示单层IR表示,方舟编译器的Maple IR提出多层中间表示:
- 高层中间表示尽可能的保留源码内部的信息,适合language-specific的分析和优化;
- 低层中间表示接近汇编指令,差不多和汇编指令有一对一的映射,可以进行通用general purpose的优化;
越高层次的IR,支持的Opcode越多,越底层的IR,支持的Opcode越接近处理器的汇编;高层次的IR,程序结构是有层级的,低层次的IR,程序结构是扁平的,变成了序列化指令的形式;高层次的IR是与平台无关的,低层次的IR变得和平台有关。多层IR表示能够最大化在IR层的优化效果。(不知道能否显式表现出多层IR)
Maple
IR存储到文件的时候有两个格式,一个是mpl,一个是mplt。mplt是声明文件,mpl是定义文件。Maple
IR的定位本身就是一种高级语言。mplt对应C++的.h,里面存放类的声明,mpt文件对应C++的.cpp文件,里面存放方法的实现。
1.1 C/C++ to Maple
ast2mpl是C和C++的前端,将clangAst转换为mpl格式的中间表示语言。
1 | ast2mpl printHuawei.c -I /usr/lib/gcc/x86_64-linux-gnu/8/include # generate printHuawei.mpl |
1.2 Java to Maple
jbc2mpl是Java的前端,java
bytecode转化为mpl格式的中间表示语言,用jar或class作为输入都可以。java-core是java语言的基础类库,想要使用java的基础包就需要这个类库的支持。
1 | # use .class as input |
1.3 Others
方舟编译器利用如下前端将除C/C++和Java以外的语言转化为中间表示语言Maple:
- dex2mpl
- js2mpl
- mplfe:前端开发框架,多个前端开发作准备
2. Maple IR设计
Maple
IR有二进制格式和ASCII码格式,但不是.mpl和.mplt。ASCII码格式包含
- declaration statements(声明语句):符号表信息
- executable states(执行语句):程序代码
每个Maple IR文件对应一个CU编译单元,编译单元由全局范围内的声明组成。声明是由函数组成的,也称为PU,PU则包含局部声明。
(类比于LLVM IR的Module,Function和Baisc Block)
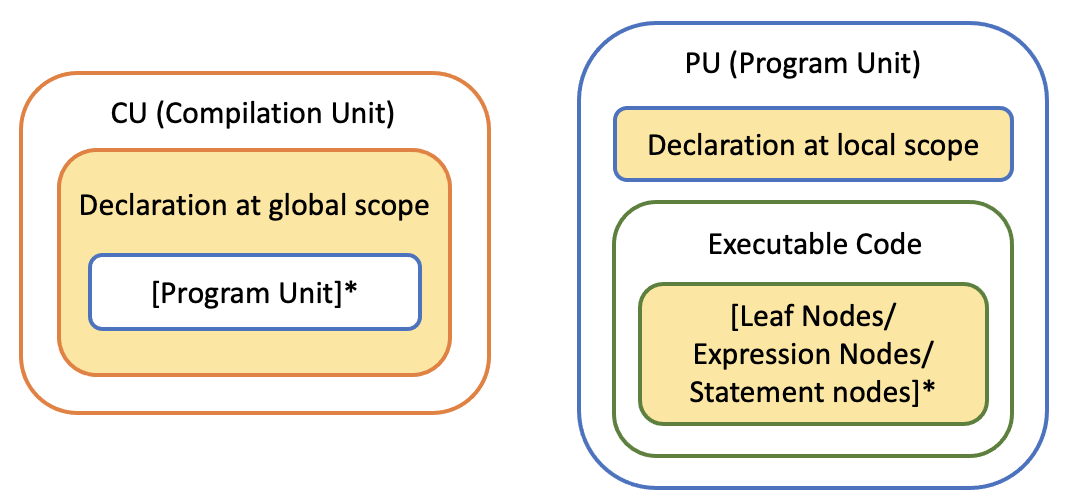
Maple IR中的execution node有三种:
- Leaf nodes (terminal nodes):constant or the value of a storeage unit
- Expression nodes: An expression node performs an operation on its operands to compute a result. Each operand can be either a leaf node or another expression node. Expression nodes are the internal nodes of expression trees.
- Statement nodes
In all the executable nodes, the opcode field specifies the operation of the node, followed by additional field specification relevant to the opcode. The operands for the node are specified inside parentheses separated commas. The general form is:
opcode fields (opnd0, opnd1, opnd2)
例如C语言中的赋值语句 "a = b" 对应的Maple IR使用 dassign (direct assignment opcode) 将b的值赋给a。
1 | dassign $a (dread i32 $b) |
若有嵌套,需要另起一行,例如表达式a = b + c - d对应的Maple IR如下
1 | dassign $a ( |
方舟的IR和LLVM IR的区别为
- 方舟编译器的IR专门为Javascript预留了12个基本类型,这显然是为了后续支持Javascript所做的准备
- LLVM IR的整型设计的更加简洁,直接用iN来表示。而方舟编译器IR是用了i16/i32/i64/u16/u32/u64来表示
2.1 From Java
如下是HelloWorld.java程序对应的Maple IR。
1 | public class HelloWorld { |
首先是一些这个类的基本信息,称为Module Declaration。
1 | flavor 1 // how the IR was produced, indicating the state of the compilation process |
接下来是符号表信息,每个文件里有一个global符号表,每个函数又分别有一个local符号表,每个符号表中有变量信息、类型信息和函数原型信息。代码中通过名字引用符号表中的信息。
1 | // 这个类的信息 |
接下来,是两个声明函数的定义,一个是构造函数,一个是main函数,函数开头是局部符号表信息。
1 | func &LHelloWorld_3B_7C_3Cinit_3E_7C_28_29V public constructor (var %_this <* <$LHelloWorld_3B>>) void { |
再看一个Java代码对应的Maple IR,感受一下Maple IR如何做算术运算。
1 | public class HelloWorld { |
这里我们从main函数中可以看出,不同于LLVM IR,Maple IR不是SSA,一个变量可以被赋值多次,和LLVM IR相同的是,每个操作数都指明了类型。语句中经常在中间位置有一个0,这是field-ID,涉及结构体或class成员的编号,对于基本数据类型,field-ID都是0。
1 | // 文件信息 |
2.2 From C/C++
如下显示C代码对应Maple IR的例子
C代码
1 | int main() { |
Maple IR,每个函数都被赋予了一个funcid。
1 | func &main public () i32 { |
C代码
1 | int foo(int i,int j){ |
Maple IR用树的形式表示statement,类似于AST的格式,组织嵌套的statement。
1 | func &foo public (var %i i32, var %j i32) i32 { |
C代码
1 | float a[10]; |
Maple IR,从这里其实可以看出,可读的Maple IR还是处于比较高层次的,因为用到了while关键字。
1 | ... |
C代码
1 | typedef struct SS{ |
Maple IR,这里我们可以看到field-ID不再是0,field-ID是为了方便直接访问一个结构体之中的field,而不是访问整个结构体。
- 支持field-ID的结构有三种:struct、class、interface;除了这三种结构,field-ID也存在,其值为0,
- field-ID的扩展主要是为了方便dassign、dread、iassign、iread这几条指令使用。
- field-ID赋值的时候,最顶层的结构是给0,然后访问其内部的每个field,每个field给一个唯一的编号,然后每个field递增1,所以访问f2时field ID是2;
- 如果要分配编号的field是一个结构,那么给其一个field-ID编号,并对其内部嵌套的field继续进行编号;
- 对于class而言,父类就像是子类的内部的结构,子类的第一个field就是父类;
- 如果一个结构既单独存在,又嵌套在另外一个结构之中,那么从不同的角度出发,这个结构的field会被分配不同field-ID编号,因为field-ID的分配是从顶层结构开始的;
1 | ... |
C代码
1 | int fact(int n) { |
Maple IR实现递归。
1 | func &fact public (var %n i32) i32 { |
给定该Java程序
1 | class A { |
class A的field ID情况下:
1、LA_3B_7C_3Cinit....
2、LA_3B_7Cseta_7C....
3、LA_3B_7Cgeta_7C...
4、a
B的情况:
1、A
2、LA_3B_7C_3Cinit....
3、LA_3B_7Cseta_7C...
4、LA_3B_7Cgeta_7C...
5、a
6、LB_3B_7C_3Cinit....
7、LB_3B_7Cseta_7C...
1 | type %SS <struct { @g1 f64, @g2 f64 }> |
3. 配置OpenArk
首先配置方舟编译器主项目,主项目最后只能生成汇编程序.s,之后介绍两个的孵化器项目mapleall和maple
engine,可以再处理.s分别至运行C/C++的.out文件和java程序的.so文件,并分别利用qemu-aarch64和maple_engine运行。
3.1 OpenArk Compiler
方舟编译器的总目录,下述项目mapleall属于FutureWei编译器分支,未来会合并到总目录这里。方舟编译器目录结构为:
- build:环境设置脚本,和一些build所用的Makefile
- samples:示例程序目录,本次发布共公开了六个示例程序
- src目录:源码目录,先介绍其中的mapleall目录
- bin:直接提供的可执行文件
- mpl_phase:maple phase的基本框架的代码
- maple_driver:maple可执行程序的主要源码所在的位置,它会调用其他的maple_开头的目录的部分内容
- maple_ipa:interleaved_manager和module_phase_manager的相关代码
- maple_ir:针对maple的ir的基本操作的相关代码,与LLVM针对IR的基本操作类似,主要是对IR进行基本的分析,获取IR所要表达的信息,为之后的优化作准备。
- maple_me:有关MeFuncPhase类别的phase的框架及其具体内容,这是phase相关的一部分,所有的具体的MeFuncPhase的子类,实现都在该目录之下。
- mpl2mpl:包含从maple ir到maple ir的转换,这种转换都是为了后续的me做准备,该目录下的主题内容是ModulePhase类别的Phase的具体实现。
- tools目录:为编译和使用过程中所用到的其他工具所预留的目录,该目录后续将存放llvm、gn、ninja
首先安装如下依赖
1 | sudo apt-get -y install openjdk-8-jdk git-core build-essential zlib1g-dev libc6-dev-i386 g++-multilib gcc-multilib linux-libc-dev gcc-5-aarch64-linux-gnu g++-5-aarch64-linux-gnu unzip tar curl python3-paramiko python-paramiko python-requests |
在OpenArkcompiler目录下执行以下命令,编译出OpenArkCompiler,默认输出路径output/TYPE/bin。
1 | source build/envsetup.sh arm debug # 设置环境变量 |
编译完成后,在output/aarch64-clang-release/bin目录下,可以看到编译出来的二进制文件,其中dex2mpl/java2jar/jbc2mpl在编译前就已经在目录src/mapleall/bin下了,只有maple是编译来的。
3.3.1 java2jar
1 | OUTPUT=$1 # HelloWorld.jar |
该脚本类似于javac和jar的联合体,将java文件变成class文件后,再打包成jar文件,使用方法如下
1 | # HelloWorld.java => HelloWorld.class => HelloWorld.jar |
3.3.2 jbc2mpl
将class文件或者jar文件转化为maple IR格式,生成的是maple
IR的最高级形态,用法如下,运行后生成文件HelloWorld.mpl和HelloWorld.mplt。
1 | ➜ helloworld git:(master) ✗ jbc2mpl -mplt /home/wchenbt/OpenArkCompiler/output/aarch64-clang-release/libjava-core/java-core.mplt HelloWorld.jar |
也可以用如下命令运行该工具将java-core.jar转换为mpl格式以后续使用,编译别的文件需要加上-mplt java-core.mplt,因为java-core是java的核心类库。
1 | jbc2mpl -injar java-core.jar -out libjava-core |
3.3.3 maple
所有的编译器都会有一个统一的命令入口,例如gcc命令,这个命令可以调用很多的工具来完成整个编译的过程,包括linker。在方舟编译器中,这个命令是maple,通过maple命令完成前端输入解析,中端优化,后端代码生成和链接。
针对maple
IR的一个工具,可以利用--run=cmd1:cmd2命令运行
- jbc2mpl:实际上是命令行运行和3.3.2的工具
- me&mpl2mpl:执行Module和Function的优化,生成HelloWorld.VtableImpl.mpl文件。
- mplcg:将maple文件编译成汇编格式,生成HelloWorld.VtableImpl.s文件
1 | ➜ helloworld git:(master) ✗ maple --run=me:mpl2mpl --option=" --O2 --quiet: --O2 --quiet --regnativefunc --no-nativeopt --maplelinker --emitVtableImpl" ./HelloWorld.mpl |
也可以直接运行如下命令,直接生成最终的汇编文件。java-core是java语言的基础类库,想要使用java的基础包就需要这个类库的支持。
1 | maple -O2 --mplt /home/wchenbt/OpenArkCompiler/output/aarch64-clang-release/libjava-core/java-core.mplt HelloWorld.jar |
3.3.4 mplcg
该工具将mpl格式生成后段汇编代码,用法如下,需要通过maple来运行mplcg,运行后生成汇编文件HelloWorld.VtableImpl.s:
1 | ➜ helloworld git:(master) ✗ maple --run=mplcg --option=" --O2 --quiet --no-pie --verbose-asm --fpic --maplelinker" --infile ./HelloWorld.VtableImpl.mpl |
3.3.5 irbuild
该工具不开源,是操作mplt文件,将其转换为二进制或者mpl文件。mplt是mpl的头文件,跟C一样,相当于.h,在maple的非后端过程中,都是使用mplt的头文件作为输入即可,链接的时候才需要使用mpl文件。将maple当成C语言来看待,maple的处理过程相当于C语言的编译过程,只需要使用其他单元的头文件声明处理当前的单元,链接的时候才需要其它的单元定义。
执行如下命令可以将HelloWorld.mplt转换为文本格式HelloWorld.irb.mpl。
1 | $> irbuild i HelloWorld.mplt |
转换后文件内容如下,可以看出类似于C++的头文件。
1 | flavor 1 |
3.3.6 others
- dex2mpl
- java2d8
- maplegen
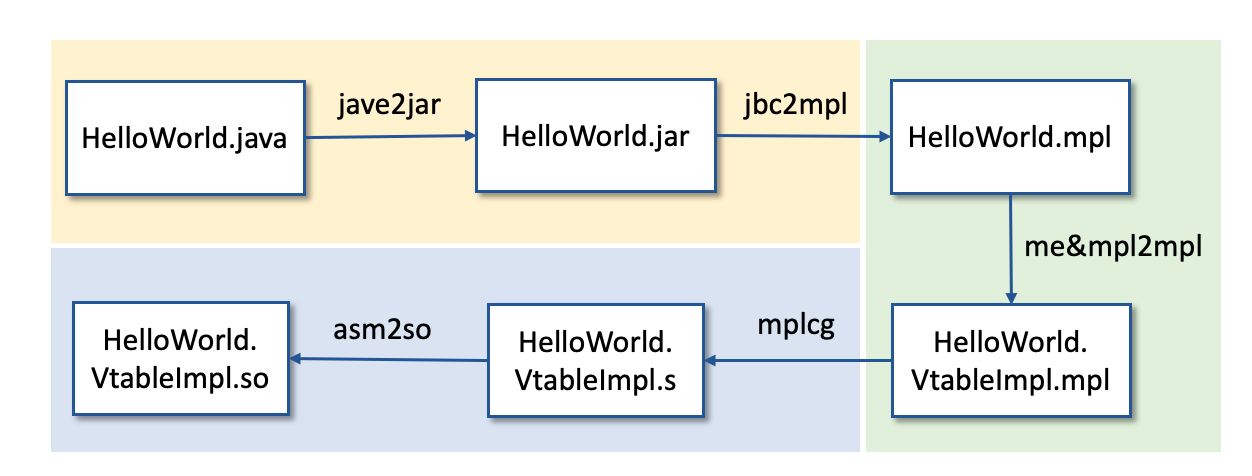
到目前为止,我们完成了Java的编译过程.jave =>.class =>.jar =>.mpl =>.s。

3.2 Mapleall for C/C++
https://gitee.com/openarkcompiler-incubator/mapleall 该项目是华为的孵化器项目,用来编译运行C/C++程序的项目。
bin/ast2mpl是方舟编译器针对C的前端,用来将clangAST转化为方舟编译器的IR
Maple,但是并没开源,是直接上传的二进制。
1 | cd mapleall |
生成的二进制文件在bin目录下,每种编译方式对应不同目录aarch64-clang-release或ark-clang-release:
- ast2mpl
- irbuild
- maple
- mplcg
若要运行C程序,执行如下命令
1 | source envsetup.sh arm release # for aarch64 target.s |
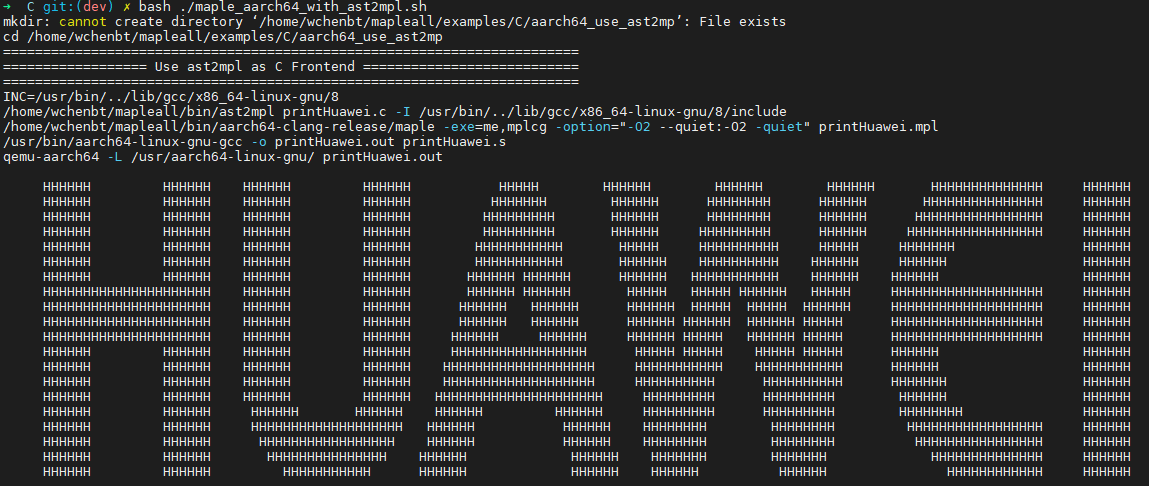
进入examples/C目录,运行maple_aarch64_with_ast2mpl.sh运行例子C程序printHuawei.c,该编译过程使用华为的前端ast2mpl,将ClangAST变为Maple
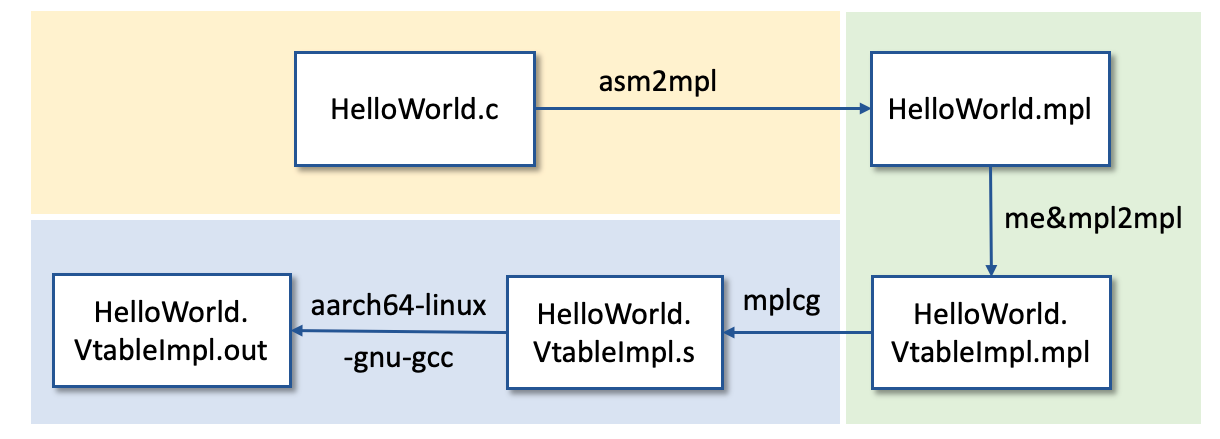
IR中间语言,编译过程为.c -> .mpl -> .s -> .out,执行的命令如下。
1 | # printHuawei.c => printHuawei.mpl |
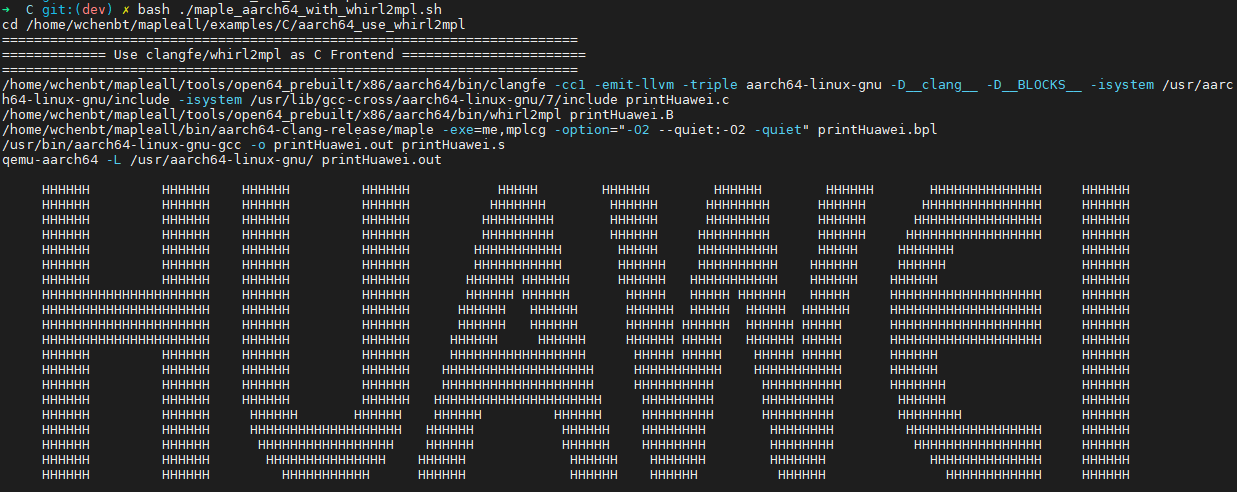
运行maple_aarch64_with_whirl2mpl.sh运行例子C程序printHuawei.c,该编译过程使用Open64的前端,将C程序变为Whirl
IR中间语言。如果自己aarch64-linux-gnu-gcc的版本是7的话,需要修改whirl2mpl这个脚本里的FLAGS如下所示。
1 | FLAGS="-cc1 -emit-llvm -triple aarch64-linux-gnu -D__clang__ -D__BLOCKS__ -isystem /usr/aarch64-linux-gnu/include -isystem /usr/lib/gcc-cross/aarch64-linux-gnu/7/include" |
运行结果如图所示,编译过程为.c -> .B -> .bpl -> .s -> .out。
现在我们完成了用方舟编译器编译C/C++项目的过程。
3.3 Maple Engine for Java
https://gitee.com/openarkcompiler-incubator/maple_engine
该项目也是一个孵化器项目,用来编译运行Java程序的项目,该项目会自动拉取编译上述mapleall项目。首先安装所需的软件包
1 | sudo apt install -y build-essential clang cmake libffi-dev libelf-dev libunwind-dev libssl-dev openjdk8-jdk openjdk-8-jdk-headless unzip python-minimal python3 gdb bc |
下载代码并设置Maple构建环境
1 | git clone https://gitee.com/openarkcompiler-incubator/maple_engine.git |
构建Maple编译器和Maple Engine
1 | ./maple_build/tools/build-maple.sh |
在另一台电脑构建定制的OpenJDK8,将构建Java核心库libcore.so和运行用户Java程序所需的如下jar文件拷贝到构建maple_engine的./maple_build/jar/目录下。Official Document
1 | # Java 核心库 |
其中一个组件 rt.jar 是方舟引擎定制版. 要生成方舟引擎定制版的 rt.jar 文件, 需要修改 OpenJDK-8 的 Object.java ,然后从源代码构建OpenJDK-8。首先安装以下依赖,
1 | sudo apt install mercurial build-essential cpio zip libx11-dev libxext-dev libxrender-dev \ |
下载OpenJDK-8的源码,在运行maple engine的电脑上查看安装的OpenJDK-8-JRE的修订版本号
1 | $ apt list openjdk-8-jre |
根据上述命令输出的版本号在构建定制OpenJDK8的电脑上执行下述命令,下载源码
1 | hg clone http://hg.openjdk.java.net/jdk8u/jdk8u -r jdk8u275-b01 ~/my_openjdk8 |
修改~/my_openjdk8/jdk/src/share/classes/java/lang/Object.java文件,插入如下字段声明:
1 | public class Object { |
构建定制的OpenJDK-8
1 | cd ~/my_openjdk8 |
把如下的已经构建好的.jar文件复制到运行maple engine机器上的目录maple_build/jar/ 下:
1 | build/linux-x86_64-normal-server-release/images/lib/rt.jar |
修改maple_build/tools/build-libcore.sh中的-bootclasspath为-sourcepath,执行如下命令构建Java核心库
1 | ./maple_build/tools/build-libcore.sh |
所有编译用户程序所需代码在目录maple_runtime/lib/x86_64目录下,主要就是libcore.so,另外还有几个工具用来编译运行java程序,在maple_build/tools目录下:
- java2asm.sh
- javac: java to java bytecode
- jbc2mpl: java bytecode to maple
- maple: maple to assembly
- asm2so.sh
- g++: .s -> .o -> .so
- run-app.sh
给定如下Java程序
1 | public class HelloWorld { |
执行如下命令对其进行编译
1 | # MAPLE_BUILD_TOOLS = maple_build/tools |
执行如下命令运行该程序
1 | "$MAPLE_BUILD_TOOLS"/run-app.sh -classpath ./HelloWorld.so HelloWorld |

调试应用程序
1 | "$MAPLE_BUILD_TOOLS"/run-app.sh -gdb -classpath ./HelloWorld.so HelloWorld |
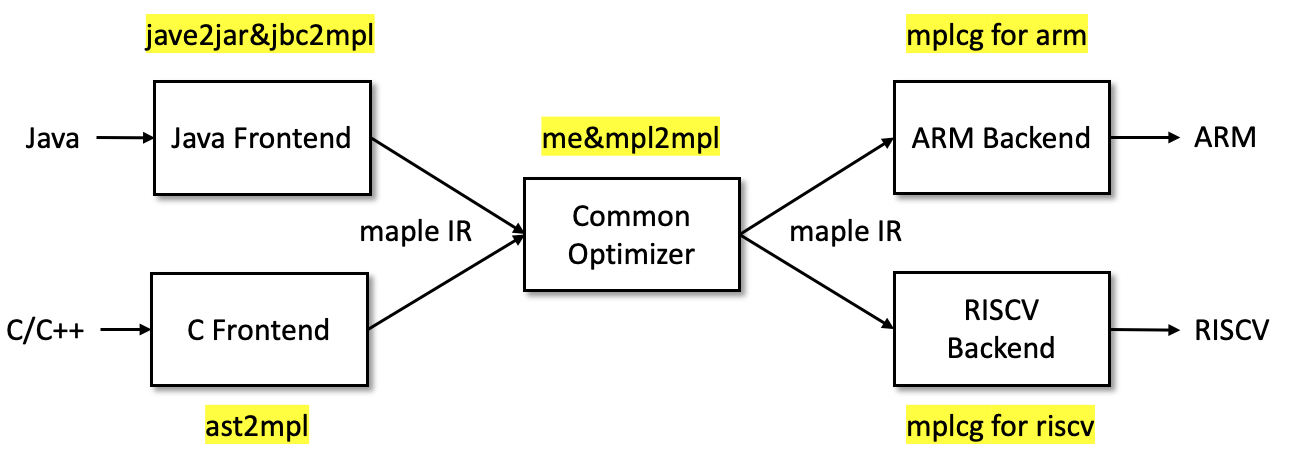
Now, we are able to compile and run both Java and C/C++ programs. The compilation process for Java is shown below:
The compilation process for C/C++ is shown below:
4. Phase介绍
官方Phase介绍 https://gitee.com/openarkcompiler/OpenArkCompiler/blob/master/doc/cn/CompilerPhaseDescription.md
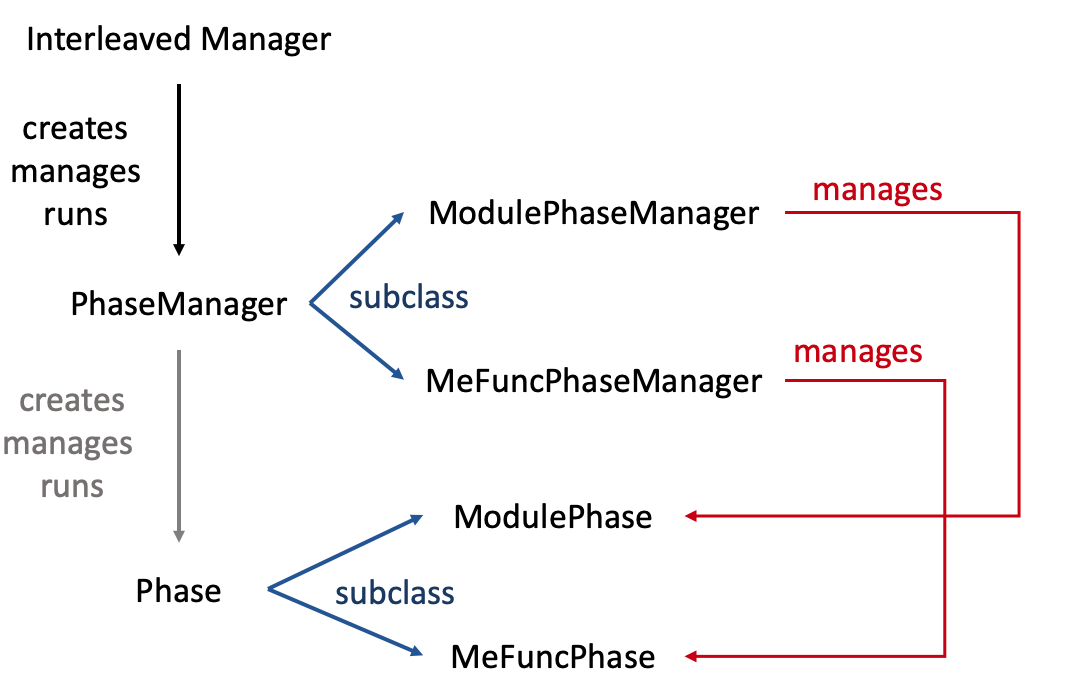
方舟编译器引入了一个phase的概念,这个概念有点类似于LLVM的pass,用于管理方舟编译器的优化。方舟编译器实现三级管理机制,InterleavedManager负责PhaseManager的创建、管理和运行;PhaseManager负责Phase的创建、管理和运行。
4.1 自定义Phase类
Phase的核心是重载Run函数,类似于LLVM
Pass的runOnXXX函数。Phase中端主要包含两大类ModulePhase和MeFuncPhase,都继承自Phase类。ModulePhase的定义在src/maple_ipa/include/module_phase.h,MeFuncPhase的定义在src/maple_me/include/me_phase.h中。当添加一个新的phase的时候,必须要实现一个Run方法,并重写PhaseName方法返回名字,例子如下:
定义新的Function Phase
1 | namespace maple { |
定义新的Module Phase
1 | namespace maple { |
The role that Run method plays is the same as
runOnXXX method places in LLVM Pass.
4.2 PhaseManager
和LLVM Pass一样,Phase都是由Manager类来管理。PhaseManager负责phase的创建、管理和运行。ModulePhase和MeFuncPhase都有对应的Manager类,分别是ModulePhaseManager和MeFuncPhaseManager,他们都是PhaseManager类的子类。Phase使用了宏的机制来实现注册,便于管理需要注册的phase。
ModulePhase有一个对应的module_phases.def文件定义系统内部的module
phase。ModulePhaseManager调用RegisterModulePhases函数注册定义在src/maple_ipa/include/module_phases.def中的phase,module_phases.def的内容如下:
1 | MODAPHASE(MoPhase_CLONE, DoClone) |
MODAPHASE第一个参数是id,第二个是phase类名,需要添加自定义的DoExample时,只需添加如下一行:
1 | MODAPHASE(MoPhase_Example, DoExample) |
MeFuncPhase有对应的me_phases.def文件。MeFuncPhaseManager调用RegisterFuncPhases函数注册定义在src/maple_me/include/me_phases.def中的phase,me_phases.def的内容如下:
1 | FUNCAPHASE(MeFuncPhase_DOMINANCE, MeDoDominance) |
FUNCAPHASE第一个参数是id,第二个是phase类名,需要自定义的MeDoExample时,只需添加如下一行:
1 | FUNCTPHASE(MeFuncPhase_Example, MeDoExample) |
注册Phase后,会调用基类PhaseManager的AddPhase函数添加自定义的phase。
4.3 InterleavedManager && DriverRunner
除了使用上面的方式自行添加phase外,还需要借助InterleavedManager和DriverRunner组成的框架对添加自定义Phase。
InterleavedManager负责phase manager的创建、管理和运行。通过调用AddPhases接口,它将创建一个对应类型的phase manager并添加进MapleVector中, 同时该phase manager相应的phase注册、添加也会自动被触发。
DriverRunner包含了从一个mpl文件到优化结果文件的所有过程。
ParseInput方法负责解析mpl文件,为后续mpl2mpl做准备工作,也为支持phase的运行
ProcessMpl2mplAndMePhases方法通过InterleavedManager加载
phases.def,实现phase的管理和运行,
DriverRunner也是通过宏的方式来集中管理phase,在phases.def文件里添加phase,然后通过InitPhases接口来遍历所有的phase并创建对应的phase
manager。phases.def文件内容如下:
1 | // Phase arguments are: name, condition. By default, all phases are required, so the condition value is 'true'. |
第一个参数是phase名字,第二个参数是条件。现有的phase默认都是enable的,对于自定义的phase可以自行添加控制条件。
4.4 Phase运行机制
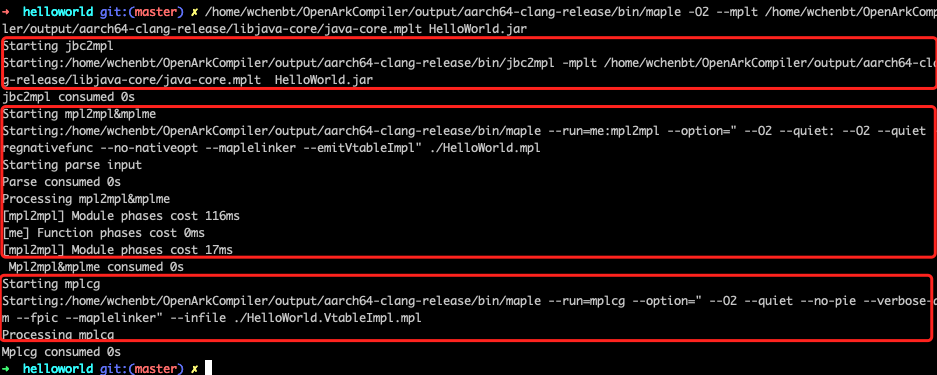
maple指令中的运行的mpl2mpl2和maple这两个过程是通过执行ModulePhase和MeFuncPhase这两类phase来实现的。mpl2mpl的优化对应着ModulePhase这类的phase,mplme的优化对应着MeFuncPhase这类phase。
1 | ➜ helloworld git:(master) ✗ maple --run=me:mpl2mpl --option=" --O2 --quiet: --O2 --quiet --regnativefunc --no-nativeopt --maplelinker --emitVtableImpl" ./HelloWorld.mpl |
maple包含了多个compiler,包括jbc2mpl、me、mpl2mpl、mplcg,其参数列表之中的--run选项显示如下。

maple运行过程中会直接调用这几个compiler,但jbc2mpl还是用的bin目录下的。
(src/maple_driver/src/maple.cpp) main <= Entry point of maple
- CompilerFactory: :GetInstance().Compile(mplOptions)
CompilerFactory构造函数:add the following compiler to supported compiler
- ADD_COMPILER("jbc2mpl", Jbc2MplCompiler)
- ADD_COMPILER("me", MapleCombCompiler)
- ADD_COMPILER("mpl2mpl", MapleCombCompiler)
- ADD_COMPILER("mplcg", MplcgCompiler)
CompilerFactory.Compiler
- compiler = compilerSelector.Select
- compiler.Compile
MapleCombCompiler.Compile
- DriverRunner.Run
DriverRunner.Run
- DriverRunner.ParseInput:解析mpl文件
- DriverRunner.ProcessMpl2mplAndMePhases
DriverRunner.ProcessMpl2mplAndMePhases
- DriverRunner.InitPhases:添加
phases.def中的Phase,并根据其类型添加到各自的Phase Manager的数据结构中- InterleavedManager.AddPhases
- InterleavedManager.run
- ModulePhaseManager.run
- MeFuncPhaseManager.run
- DriverRunner.InitPhases:添加
InterleavedManager.AddPhases
- ModulePhase
- ModulePhaseManager.RegisterModulePhases
module_phases.def - ModulePhaseManager.AddModulePhases
- ModulePhaseManager.RegisterModulePhases
- MeFuncPhase
- MeFuncPhaseManager.RegisterFuncPhases
me_phases.def - MeFuncPhaseManager.AddPhasesNoDefault
- MeFuncPhaseManager.RegisterFuncPhases
- ModulePhase
5. 自定义Phase
5.1 自定义Module Phase
在src/mapleall/mpl2mpl/目录下写入自定义的ModulePhase,创建继承ModulePhase的类DoExample,头文件example.h和cpp文件example.cpp如下:
1 | // src/mapleall/mpl2mpl/src/example.h |
该Phase仅输出当前module的entry function名。
1 | // src/mapleall/mpl2mpl/src/example.cpp |
在src/mapleall/mpl2mpl/BUILD.gn中将该类添加至被编译的对象中
1 | # src/mapleall/mpl2mpl/BUILD.gn |
在Module
Phase对应的文件中src/mapleall/maple_ipa/include/module_phases.def中加入自定义的Phase
1 | MODAPHASE(MoPhase_Example, DoExample) |
相应的,在src/mapleall/maple_ipa/src/module_phase_manager.cpp中加入头文件
1 |
|
在全局Phase文件src/mapleall/maple_driver/defs/phases.def中添加自定义的Phase
1 | ADD_PHASE("example", true) |
在OpenArk Compiler主目录执行如下命令,重新编译maple
1 | make maple |
进入samples/helloworld目录下,依次执行如下命令
1 | # HelloWorld.java => HelloWorld.class => HelloWorld.jar |
运行情况如下,我们可以看到在最后一步,输出了我们自己编写Phase的信息HarperLHelloWorld_3B_7Cmain_7C_28ALjava_2Flang_2FString_3B_29V。

5.2 自定义Function Phase
在src/mapleall/maple_me/目录下写入自定义的MeFuncPhase,创建继承MeFuncPhase的MeDoMeExample类,头文件me_example.h和cpp文件me_example.cpp如下:
1 | // src/mapleall/maple_me/include/me_example.h |
当前只输出每个函数的名称。
1 | // src/mapleall/maple_me/src/me_example.cpp |
在src/mapleall/maple_me/BUILD.gn文件中添加me_example.cpp到被编译的对象中,
1 | src_libmplme = [ |
在定义Function
Phase的文件src/mapleall/maple_me/include/me_phases.def中加入如下信息
1 | FUNCAPHASE(MeFuncPhase_DOEXAMPLE, MeDoMeExample) |
并在相应src/mapleall/maple_me/src/me_phase_manager.cpp中加入头文件
1 |
最后在全局Phase文件src/mapleall/maple_driver/defs/phases.def中加入该Phase
1 | ADD_PHASE("me_example", true) |
在OpenArk Compiler主目录执行如下命令,重新编译maple
1 | make maple |
进入samples/helloworld目录下,依次执行如下命令
1 | # HelloWorld.java => HelloWorld.class => HelloWorld.jar |
运行情况如下,我们可以看到在最后一步,输出了我们自己编写Phase的信息。

7. 插桩示例
接下来,我们做一些插桩的工作,针对如下c文件,我们希望在main函数中添加第12行对函数f1的调用。
1 |
|
我们先进入mapleall目录下,执行ast2mpl命令,先获得该文件对应的maple
IR
1 | ./bin/ast2mpl test.c -I /usr/lib/gcc/x86_64-linux-gnu/8/include |
该文件IR如下,我们需要在14行添加call &f1()
1 | # ast2mpl test.c -I /usr/lib/gcc/x86_64-linux-gnu/8/include |
我们定义如下MeDoMeExample类,继承自MeFuncPhase,该类每次操作一个函数.
We create header file me_example.hand cpp file
me_example.cpp in directory
src/mapleall/maple_me/include and
src/mapleall/maple_me/src respectively. This is the
traditional directory in which Huawei developers put all exsiting
function phases. The header file is shown as below
1 | // src/mapleall/maple_me/include/me_example.h |
The cpp file is a little complex. Because this phase is a function
phase, so the Run method will be executed for each
function. The first step is to check if current function is main
function.
1 |
|
Then, we need to get the statememt
callassigned &f2 () { dassign %retvar_13 0 } that calls
function f2, so that we can insert new call statement before it. We
traverse every statement in every basic block using two loops. By
checking if the opcode of a statement is OP_call or
OP_callassigned, we can easily find the statement
callassigned &f2(). Once the statement to be inserted
before is found, we dump current basic block before and after
instrumentation to check if we succeed.
1 | for (auto &bb : func->GetAllBBs()) { // for each basic block |
The core instrumentation logic is shown as below. Because
StmtNode is the base class of all types of node, to access
the methods of statement with specific type, we cast stmt
to type CallNode. Then we access the target function called
by statement
callassigned &f2 () { dassign %retvar_13 0 } using
PUIdx.
From line 4, we can see that each function is a program unit and are
given a unique id to index. All functions are declared at global
declaration part, therefore we can get a function by looking for the
global function table using Puidx. Now we have function
f2, the only question left is how to access function
f1 so that we can create a call statement to invoke it.
1 | CallNode *callNode = static_cast<CallNode*>(&stmt); // cast stmt to callnode type |
We achieve this by iterate all functions in this module, and check if
current function is neither main function, nor f2. Once we get the
variable mirFuncthat corresponds to function
f1, we create a callstmt with type CallNode at
line 4. The opcode of this statement is set to be OP_call.
This statement currently doesn't have any target. Therefore, we set its
target using method SetPUIdx with parameter
mirFunc->GetPuidx(), which is exacly f1. Finally, we
insert the newly created statement callStmt before the
statement that calls function f2 stmt at line 10. Now, all
programming is done.
1 | for (auto &mirFunc: func->GetMIRModule().GetFunctionList()) { // iterate all functions in current mode |
To include this phase into the target to be compiled, we add the new
phase me_example.cppto the ninja build file
src/mapleall/maple_me/BUILD.gn.
1 | // src/mapleall/maple_me/BUILD.gn |
As shown above, we need to register this phase by adding the
following lines in corresponding .def files.
1 | // add this line to src/mapleall/maple_me/include/me_phases.def |
We further need to include the new header file
me_example.h in function phase manager
src/mapleall/maple_me/src/me_phase_manager.cpp to pass
compilation.
1 |
The last step is executing make maple in the root
directory of OpenArk Compiler to integrate this phase into executable
maple.
To verify if the instrumentation succeed, we execute
maple in the following way. The run option is specifed as
--run=me&mpl2mpl to perform optimization in function
level and module level.
1 | $> maple --run=me:mpl2mpl -option="-O2 --quiet:-O2 -quiet" test.mpl |
From the output log, we know that maple processes module
phase 3 times (line 7, line 35, line 37) and processes function phase
two times (line 34, line 36). Our instrumentation phase is invoked at
the first time of processing funtion phase. Before processing our
customized phase, there is only a function call at line 15, whereas,
there are two function call at line 29, 30 after instrumention.
To double check if we succeed, the maple IR of function main in the
output maple file test.Vtablempl.mpl is shown below. We can
see there is a new statement at line 12 to invoke function f1.
1 | func &main public () i32 { |
Finally, we compile this maple file to assembly code using
maple with option --run=mplcg, further to
executable using aarch64-linux-gnu-gccand check if it can
output "f1f2 by running test.out in qemu.

The result shows that "f1f2" is successfully outputed, and we can do instrumentation using the framework of OpenArk Compiler.
Reference
- 知乎专栏 https://zhuanlan.zhihu.com/openarkcompiler
- https://zhuanlan.zhihu.com/p/80624361
- 官方IR Maple的设计文档 https://gitee.com/openarkcompiler/OpenArkCompiler/blob/master/doc/en/MapleIRDesign.md
- https://gitee.com/openarkcompiler-incubator/mapleall/blob/dev/doc/maple_ir_spec.md
- Fred Chow的论文https://queue.acm.org/detail.cfm?id=2544374
- 比较完整的知乎文章 https://zhuanlan.zhihu.com/p/137526426