How to config MTE using Qemu

How to config MTE using Qemu

1. Qemu 5.1.0

1
2
3
4
5
6
7
8
9
10
11
12
# download qemu-5.1.0
wget https://download.qemu.org/qemu-5.1.0.tar.xz
tar xvJf qemu-5.1.0.tar.xz
cd qemu-5.1.0

# build & install qemu-5.1.0
./configure --target-list=arm-softmmu,aarch64-softmmu
make
sudo make install

# check version (v5.1 is required)
qemu-system-aarch64 --version

image-20200817144007620

2. GNU ToolChain 9.2

1
2
3
4
5
6
7
8
9
10
11
wget https://developer.arm.com/-/media/Files/downloads/gnu-a/9.2-2019.12/binrel/gcc-arm-9.2-2019.12-x86_64-aarch64-none-linux-gnu.tar.xz
mkdir toolchains
tar -xJf gcc-arm-9.2-2019.12-x86_64-aarch64-none-linux-gnu.tar.xz -C toolchains

# set path
vim ~/.zshrc
PATH=$PATH:/home/wchenbt/toolchains/gcc-arm-9.2-2019.12-x86_64-aarch64-none-linux-gnu/bin
source ~/.zshrc

# check version (v9.2 is required)
aarch64-none-linux-gnu-gcc --version

3. Compile Linux Kernel

1
2
3
4
5
git clone https://git.kernel.org/pub/scm/linux/kernel/git/arm64/linux.git Linux_Arm
cd Linux_Arm

# check out to the branch that add memory tagging extension
git checkout for-next/mte

1
2
3
4
5
# compile linux kernel using gnu toolchain 9.2
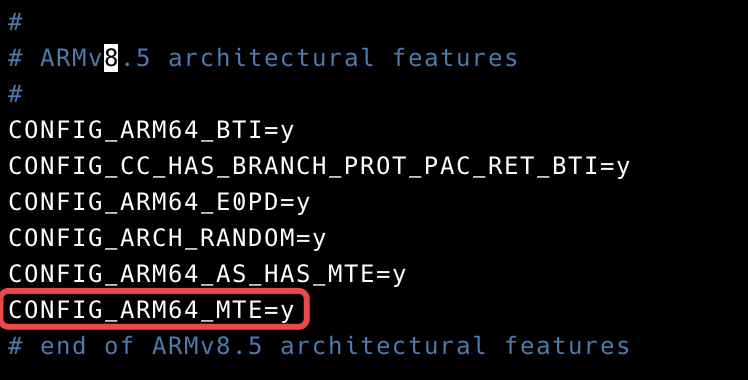
# we can find option CONFIG_ARM64_MTE=y in .config
ARCH=arm64 CROSS_COMPILE=aarch64-none-linux-gnu- make defconfig

ARCH=arm64 CROSS_COMPILE=aarch64-none-linux-gnu- make -j64

4. Make Rootfs

1
2
3
4
5
6
7
8
9
10
11
12
13
14
15
16
17
18
19
20
21
22
23
24
25
26
27
28
29
30
31
32
33
34
35
36
37
38
39
40
41
42
43
44
45
sudo apt-get install qemu-user-static binfmt-support
wget http://cdimage.ubuntu.com/ubuntu-base/releases/20.04/release/ubuntu-base-20.04-base-arm64.tar.gz

mkdir rootfs
dd if=/dev/zero of=ubuntu-20.04-rootfs_ext4.img bs=1M count=4096 oflag=direct
mkfs.ext4 ubuntu-20.04-rootfs_ext4.img
sudo mount -t ext4 ubuntu-20.04-rootfs_ext4.img rootfs/
sudo tar -xzf ubuntu-base-20.04-base-arm64.tar.gz -C rootfs/

sudo cp /usr/bin/qemu-aarch64-static rootfs/usr/bin/
sudo cp /etc/resolv.conf rootfs/etc/resolv.conf
sudo mount -t proc /proc rootfs/proc
sudo mount -t sysfs /sys rootfs/sys
sudo mount -o bind /dev rootfs/dev
sudo mount -o bind /dev/pts rootfs/dev/pts

# install kernel modules
cd Linux_Arm
ARCH=arm64 CROSS_COMPILE=aarch64-none-linux-gnu- make modules -j8
sudo ARCH=arm64 CROSS_COMPILE=aarch64-none-linux-gnu- make modules_install INSTALL_MOD_PATH=../rootfs

sudo chroot rootfs
# install essential packages
apt-get update
apt-get install sudo vim bash-completion -y
apt-get install net-tools ethtool ifupdown network-manager iputils-ping -y
apt-get install rsyslog resolvconf udev -y

apt-get install systemd -y

# add user wchenbt
adduser wchenbt
adduser wchenbt sudo
echo "Ubuntu" >/etc/hostname
echo "127.0.0.1 localhost" >/etc/hosts
echo "127.0.0.1 Ubuntu">>/etc/hosts
dpkg-reconfigure resolvconf
dpkg-reconfigure tzdata
exit

sudo umount rootfs/proc
sudo umount rootfs/sys
sudo umount rootfs/dev/pts
sudo umount rootfs/dev
sudo umount rootfs

5. Launch Qemu

1
2
3
4
5
6
7
8
9
10
11
12
13
14
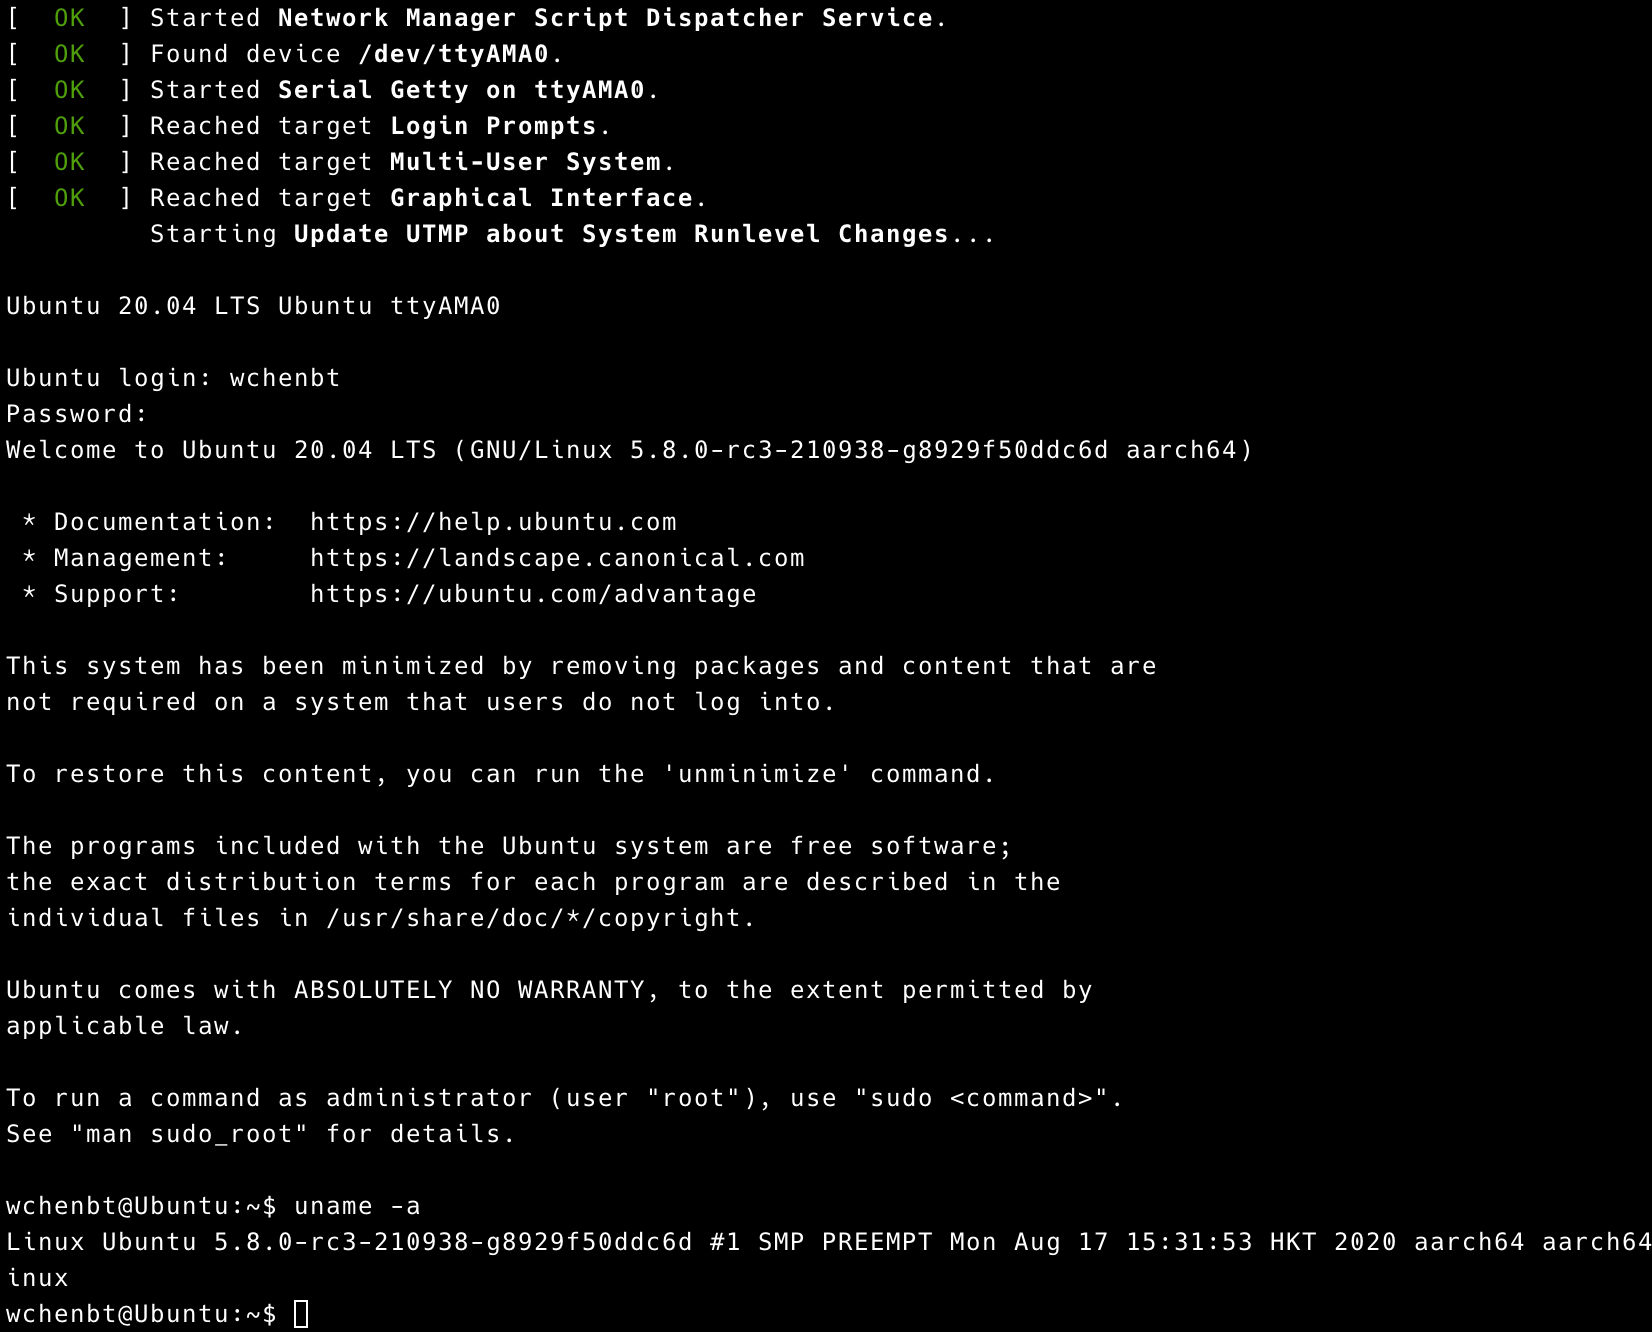
# -m the type of machine (virt,mte=on is required)
# -cpu the type of virtual cpu (max is required, other cpus don't support mte)

qemu-system-aarch64 \
-machine virt,mte=on \
-smp 4 \
-cpu max \
-m 2048M \
-nographic \
-kernel /home/wchenbt/Projects/Linux_Arm/arch/arm64/boot/Image \
-append "console=ttyAMA0 root=/dev/vda rw" \
-drive if=none,file=ubuntu-20.04-rootfs_ext4.img,id=hd0,format=raw \
-device virtio-blk-device,drive=hd0 \
-net user,hostfwd=tcp::10023-:22 -net nic

6. Test MTE

The following test file comes from https://kernel.googlesource.com/pub/scm/linux/kernel/git/arm64/linux/+/refs/heads/for-next/mte/Documentation/arm64/memory-tagging-extension.rst

1
2
3
4
5
6
7
8
9
10
11
12
13
14
15
16
17
18
19
20
21
22
23
24
25
26
27
28
29
30
31
32
33
34
35
36
37
38
39
40
41
42
43
44
45
46
47
48
49
50
51
52
53
54
55
56
57
58
59
60
61
62
63
64
65
66
67
68
69
70
71
72
73
74
75
76
77
78
79
80
81
82
83
84
85
86
87
88
89
90
91
92
93
94
95
96
97
98
99
100
101
102
103
104
105
106
107
108
109
110
111
112
113
114
115
116
117
/*
* To be compiled with -march=armv8.5-a+memtag
*/
#include <errno.h>
#include <stdint.h>
#include <stdio.h>
#include <stdlib.h>
#include <unistd.h>
#include <sys/auxv.h>
#include <sys/mman.h>
#include <sys/prctl.h>

/*
* From arch/arm64/include/uapi/asm/hwcap.h
*/
#define HWCAP2_MTE (1 << 18)

/*
* From arch/arm64/include/uapi/asm/mman.h
*/
#define PROT_MTE 0x20

/*
* From include/uapi/linux/prctl.h
*/
# define PR_SET_TAGGED_ADDR_CTRL 55
# define PR_GET_TAGGED_ADDR_CTRL 56
# define PR_TAGGED_ADDR_ENABLE (1UL << 0)
# define PR_MTE_TCF_SHIFT 1
# define PR_MTE_TCF_NONE (0UL << PR_MTE_TCF_SHIFT)
# define PR_MTE_TCF_SYNC (1UL << PR_MTE_TCF_SHIFT)
# define PR_MTE_TCF_ASYNC (2UL << PR_MTE_TCF_SHIFT)
# define PR_MTE_TCF_MASK (3UL << PR_MTE_TCF_SHIFT)
# define PR_MTE_TAG_SHIFT 3
# define PR_MTE_TAG_MASK (0xffffUL << PR_MTE_TAG_SHIFT)

/*
* Insert a random logical tag into the given pointer.
*/
#define insert_random_tag(ptr) ({ \
uint64_t __val; \
asm("irg %0, %1" : "=r" (__val) : "r" (ptr)); \
__val; \
})

/*
* Set the allocation tag on the destination address.
*/
#define set_tag(tagged_addr) do { \
asm volatile("stg %0, [%0]" : : "r" (tagged_addr) : "memory"); \
} while (0)

int main()
{
unsigned char *a;
unsigned long page_sz = sysconf(_SC_PAGESIZE);
unsigned long hwcap2 = getauxval(AT_HWCAP2);

/* check if MTE is present */
if (!(hwcap2 & HWCAP2_MTE))
return EXIT_FAILURE;

/*
* Enable the tagged address ABI, synchronous MTE tag check faults and
* allow all non-zero tags in the randomly generated set.
*/
if (prctl(PR_SET_TAGGED_ADDR_CTRL, PR_TAGGED_ADDR_ENABLE |
PR_MTE_TCF_SYNC | (0xfffe << PR_MTE_TAG_SHIFT),
0, 0, 0)) {
perror("prctl() failed");
return EXIT_FAILURE;
}

a = mmap(0, page_sz, PROT_READ | PROT_WRITE,
MAP_PRIVATE | MAP_ANONYMOUS, -1, 0);
if (a == MAP_FAILED) {
perror("mmap() failed");
return EXIT_FAILURE;
}

/*
* Enable MTE on the above anonymous mmap. The flag could be passed
* directly to mmap() and skip this step.
*/
if (mprotect(a, page_sz, PROT_READ | PROT_WRITE | PROT_MTE)) {
perror("mprotect() failed");
return EXIT_FAILURE;
}

/* access with the default tag (0) */
a[0] = 1;
a[1] = 2;

printf("a[0] = %hhu a[1] = %hhu\n", a[0], a[1]);

/* set the logical and allocation tags */
a = (unsigned char *)insert_random_tag(a);
set_tag(a);

printf("%p\n", a);

/* non-zero tag access */
a[0] = 3;
printf("a[0] = %hhu a[1] = %hhu\n", a[0], a[1]);

/*
* If MTE is enabled correctly the next instruction will generate an
* exception.
*/
printf("Expecting SIGSEGV...\n");
a[16] = 0xdd;

/* this should not be printed in the PR_MTE_TCF_SYNC mode */
printf("...haven't got one\n");

return EXIT_FAILURE;
}

Compiled the above test file with -march=armv8.5-a+memtag.

1
2
gcc test.c -march=armv8.5-a+memtag
./a.out

This executable generates an exception due to the invalid memory access a[16] .
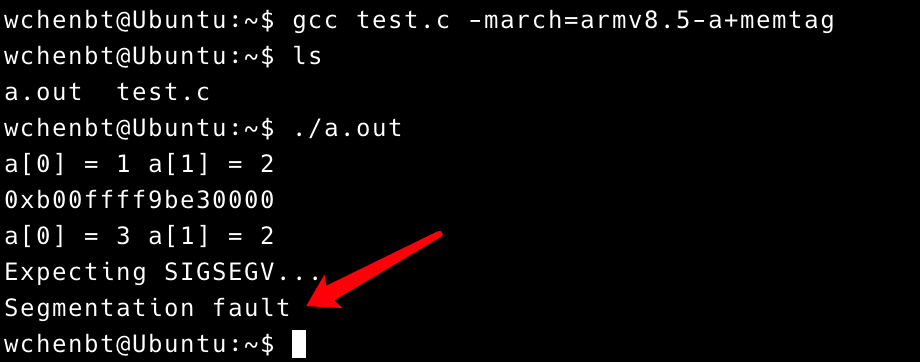
image-20200817204848121

How to config MTE using Arm Studio

Prerequisites:

  1. Download and install Arm Development Studio for either Linux or Windows. Obtain a 30-day evaluation license so that the project can be built successfully.
  2. Download and install Armv8-A Base RevC AEM FVP (Fixed Virtual Platform) that supports Memory Tagging Extension for Linux (No windows version online, need to be compiled by ourselves).

Procedure

  1. Create a new C project, select: File > New > Project.
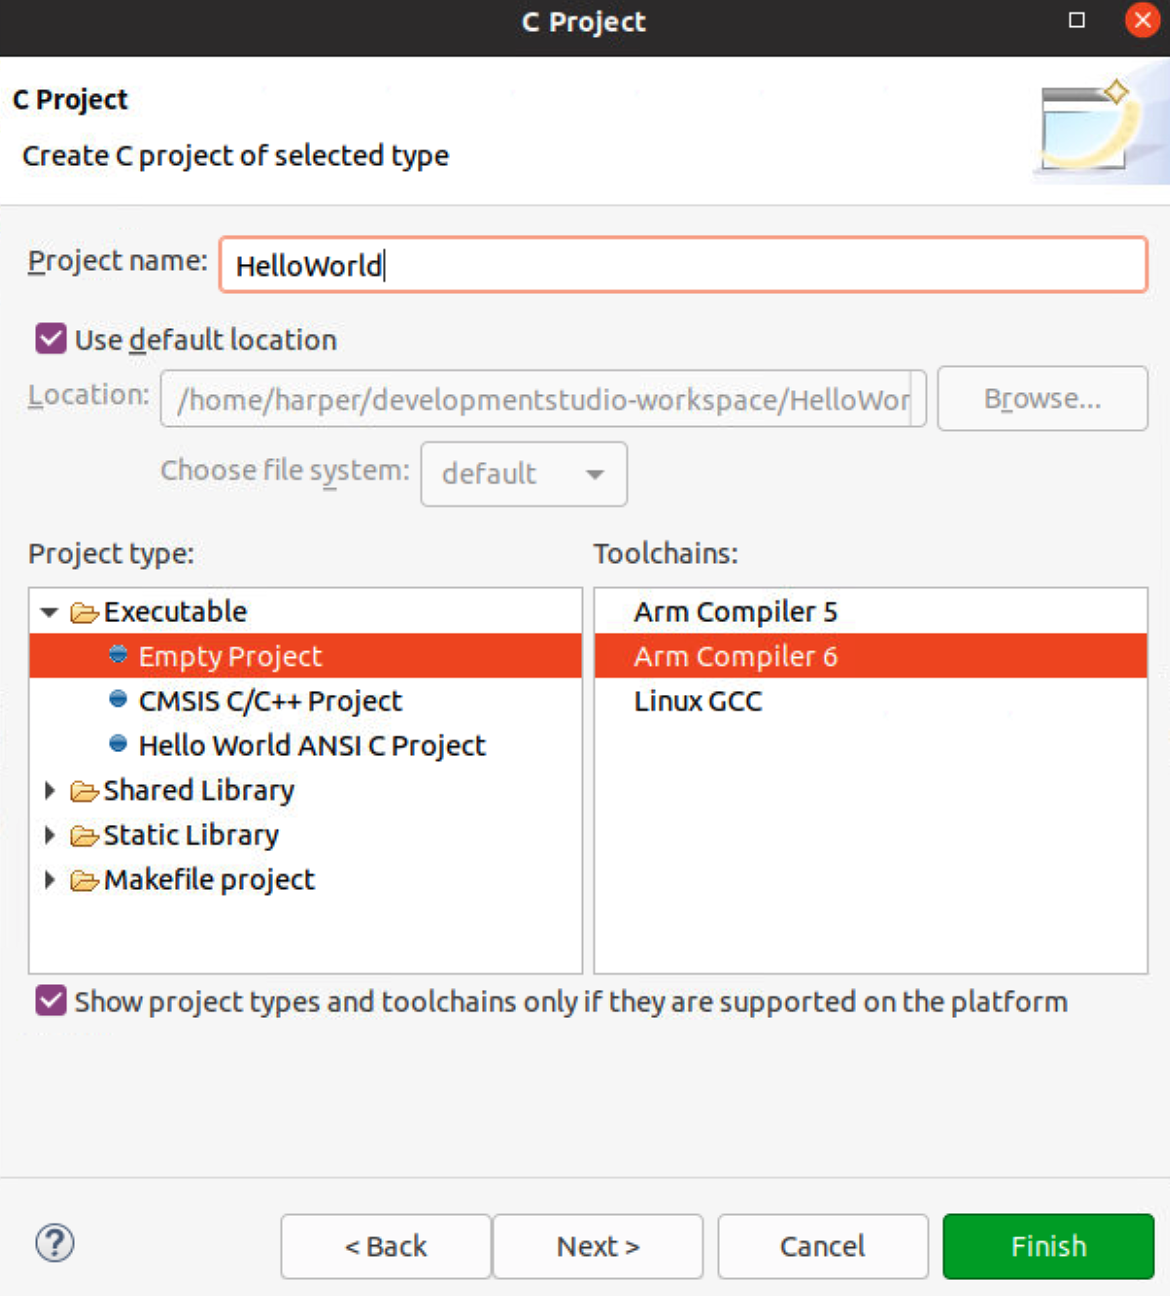
  1. Expand C/C++ menu, and select C project, then click Next.
  2. Give the project a name, select project type as Executable > Empty Project, then select Arm Compiler 6 Toolchains.
  3. Add asm and src directory, create main.c file under src directory. The asm directory is organized as follows.
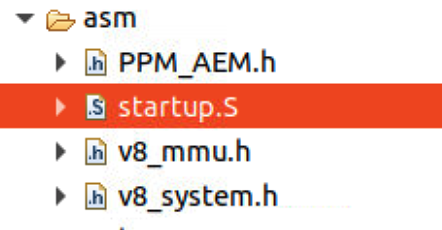
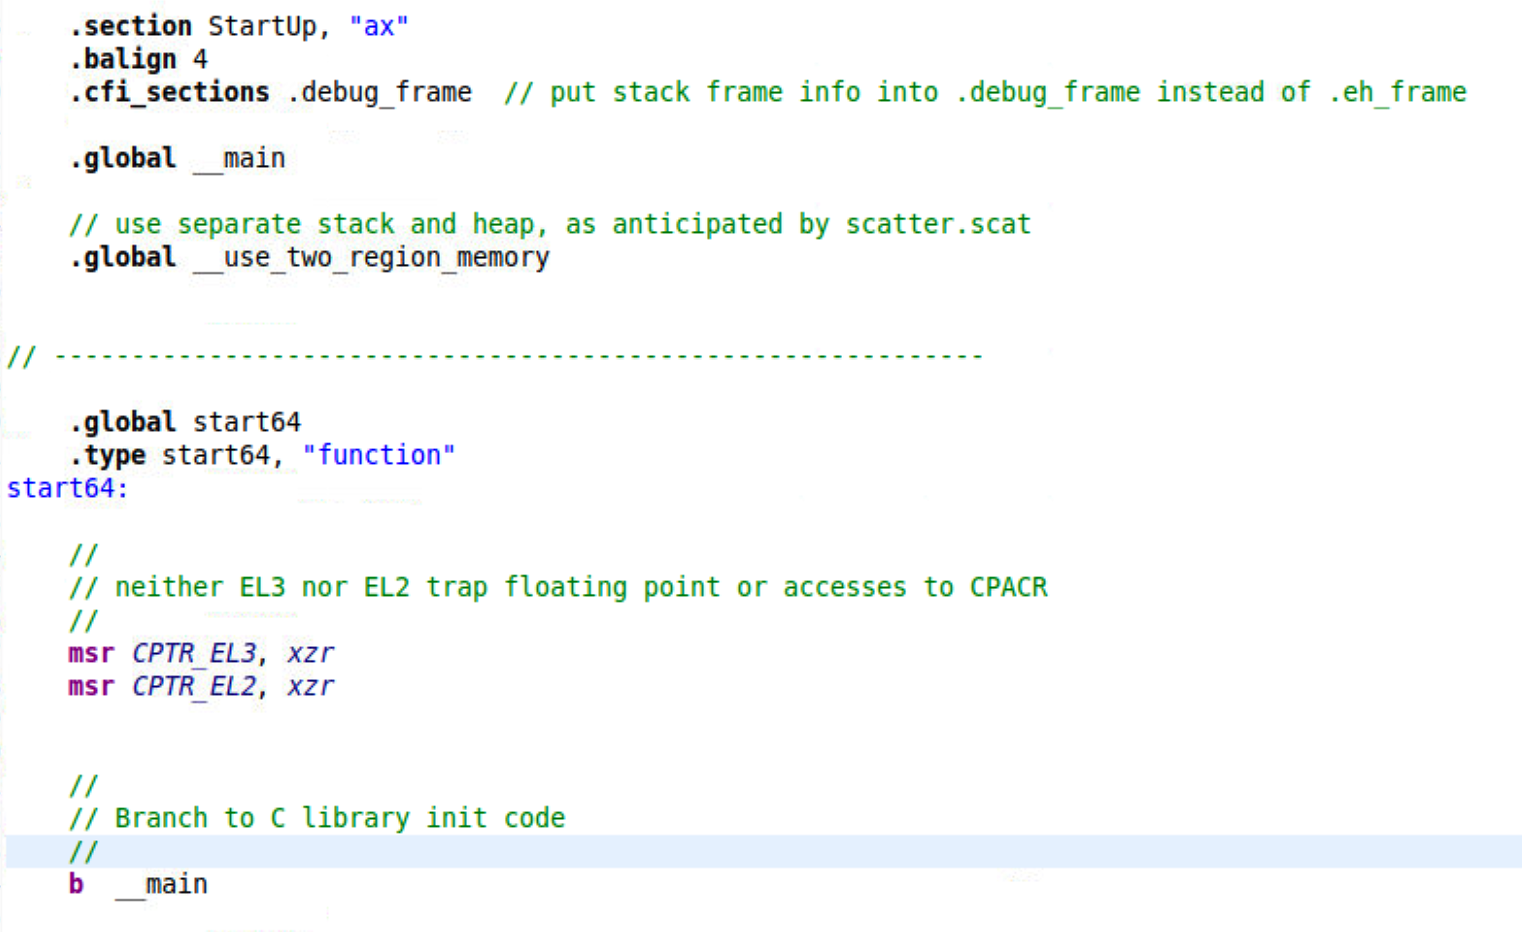
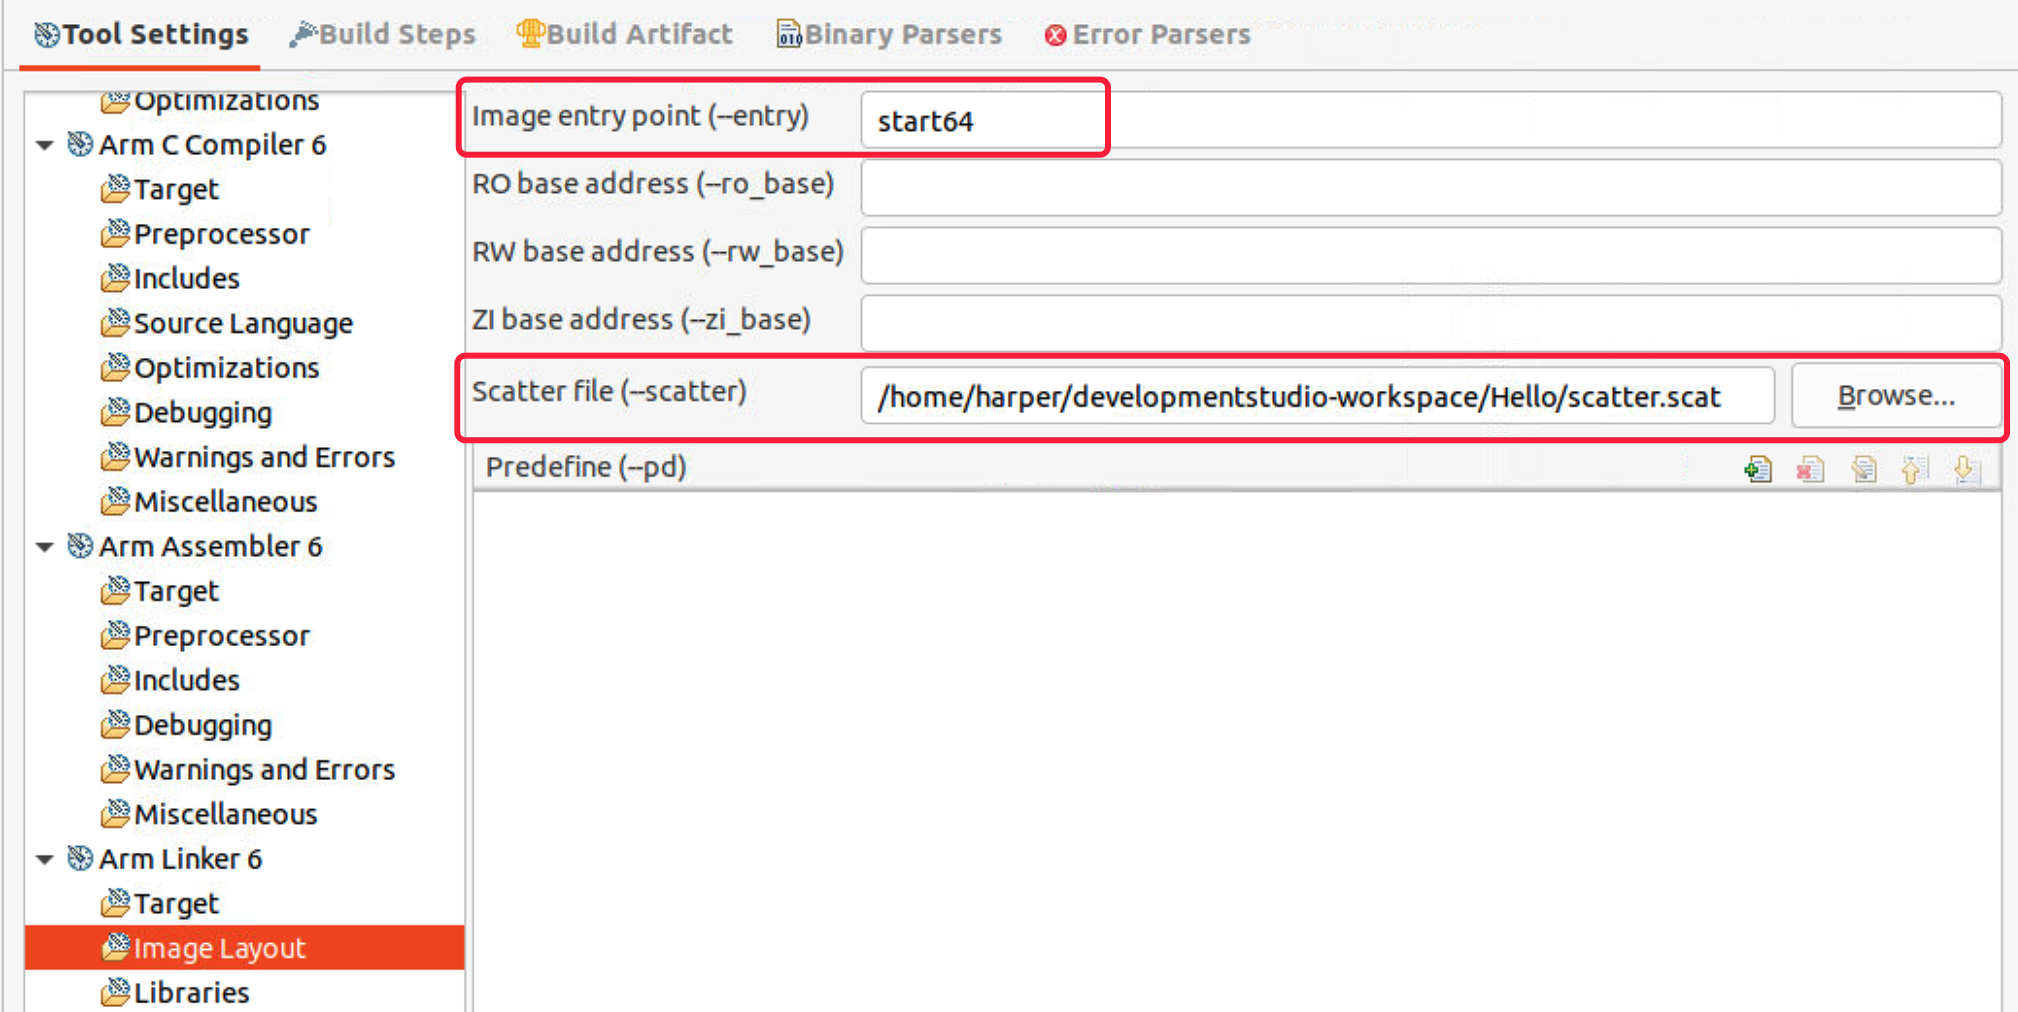
The FVP is a bare metal so startup.S is the startup code used to setup cache, MMU, stak and enable hardware floating point, etc. Without the startup code, even the simplest printf function cannot be executed. The startup code setups environment, then jumps to C library init code __main to execute the real function. We need to specify the entry point as start64 to run startup code at first.
  1. Right-click the project and select Properties to configure the project for further build.

    1. In the Tool Settings tab, select All Tools Settings > Target to specify the Target CPU. Here I select Cortex-A76 AArch64 (The target CPU may be not 100% consistent to the real FVP, but it should be OK.)
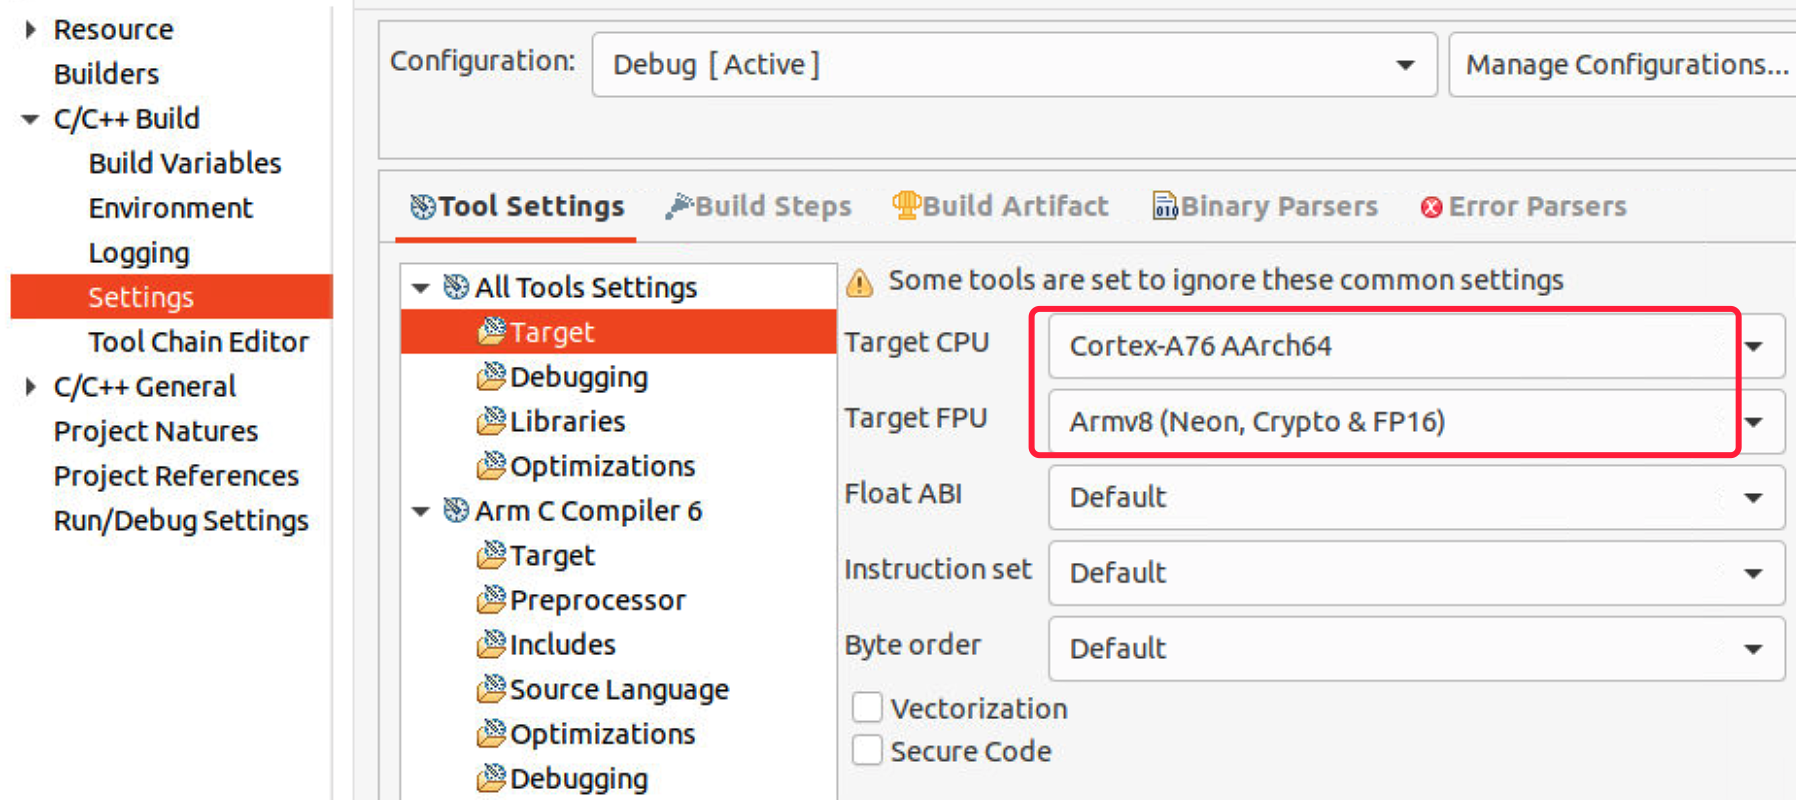
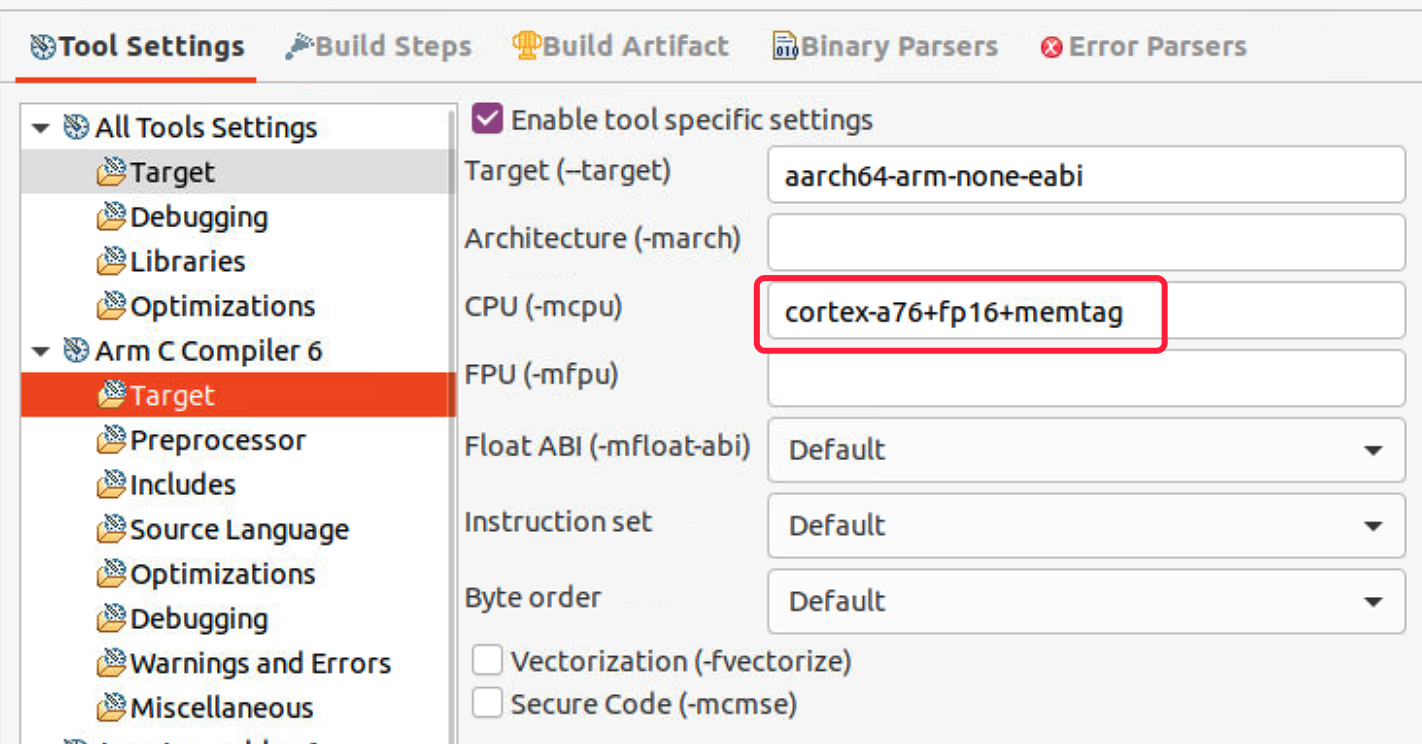
    1. Select Arm C Compiler 6 > Target, enable tool specific settings. We need to add +memtag feature in -mcpu option to provide hardware support for memory tagging, for more detailed information, please refer to armclang_ref.
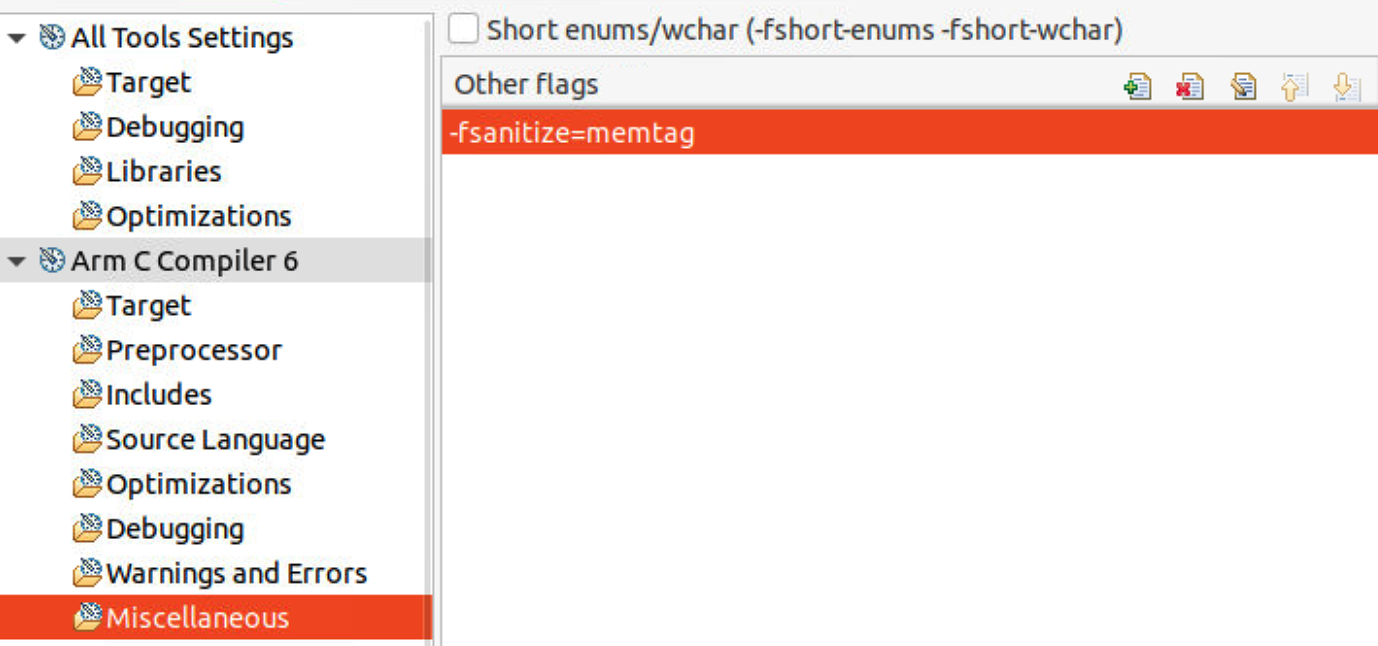
    1. Select Arm C Compiler 6 > Miscellaneous, add flag -fsanitize=memtag so that the compiler will use memory tagging instructions (IRG, ADDG, SUBG…) during code generation to protect the memory allocations on the stack. For more detailed information, please refer to armclang_ref.
    1. Select Arm Linker 6 > Image Layout, specify the entry point as start64, then browse the scatter file.
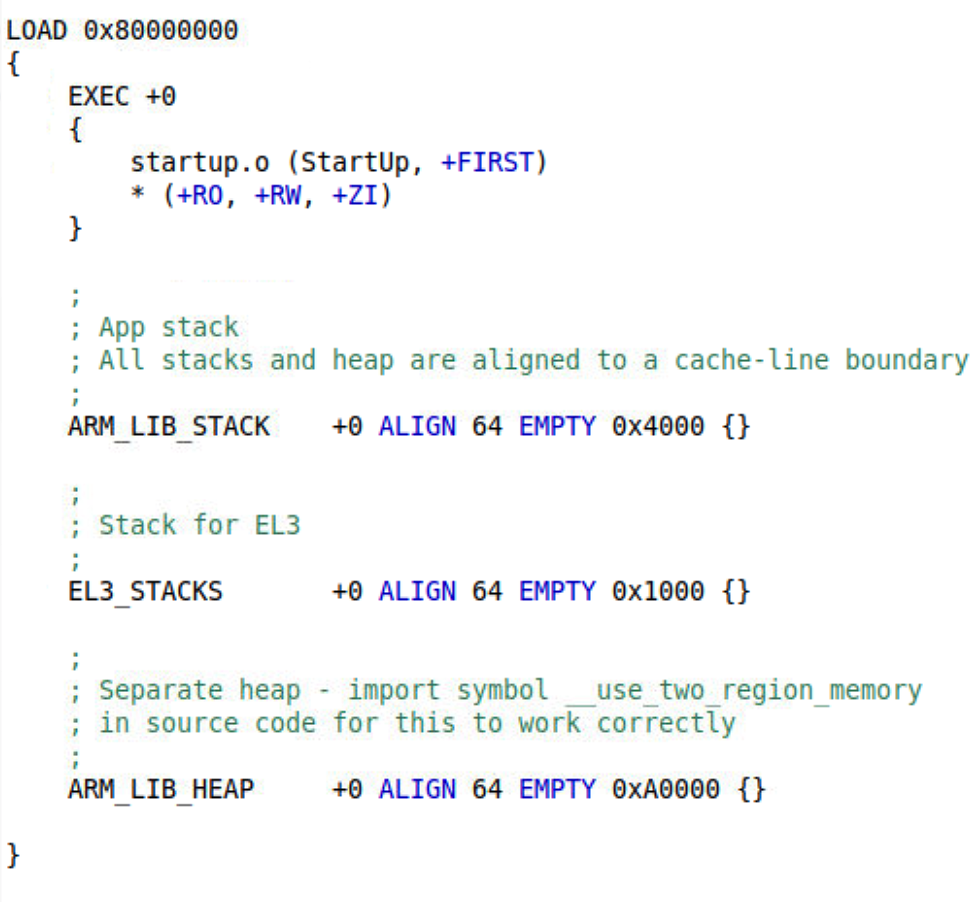
    1. Scatter file set up the RO base address (run the code from memory 0x80000000), etc.
    1. Select Arm Linker 6 > Miscellaneous, add flag –library_security=v8.5a. This flag lets the armlink link the code with the library that compiled with memory tagging extension to provide full memory tagging stack protection. For more detailed information, please refer to armclang_ref.
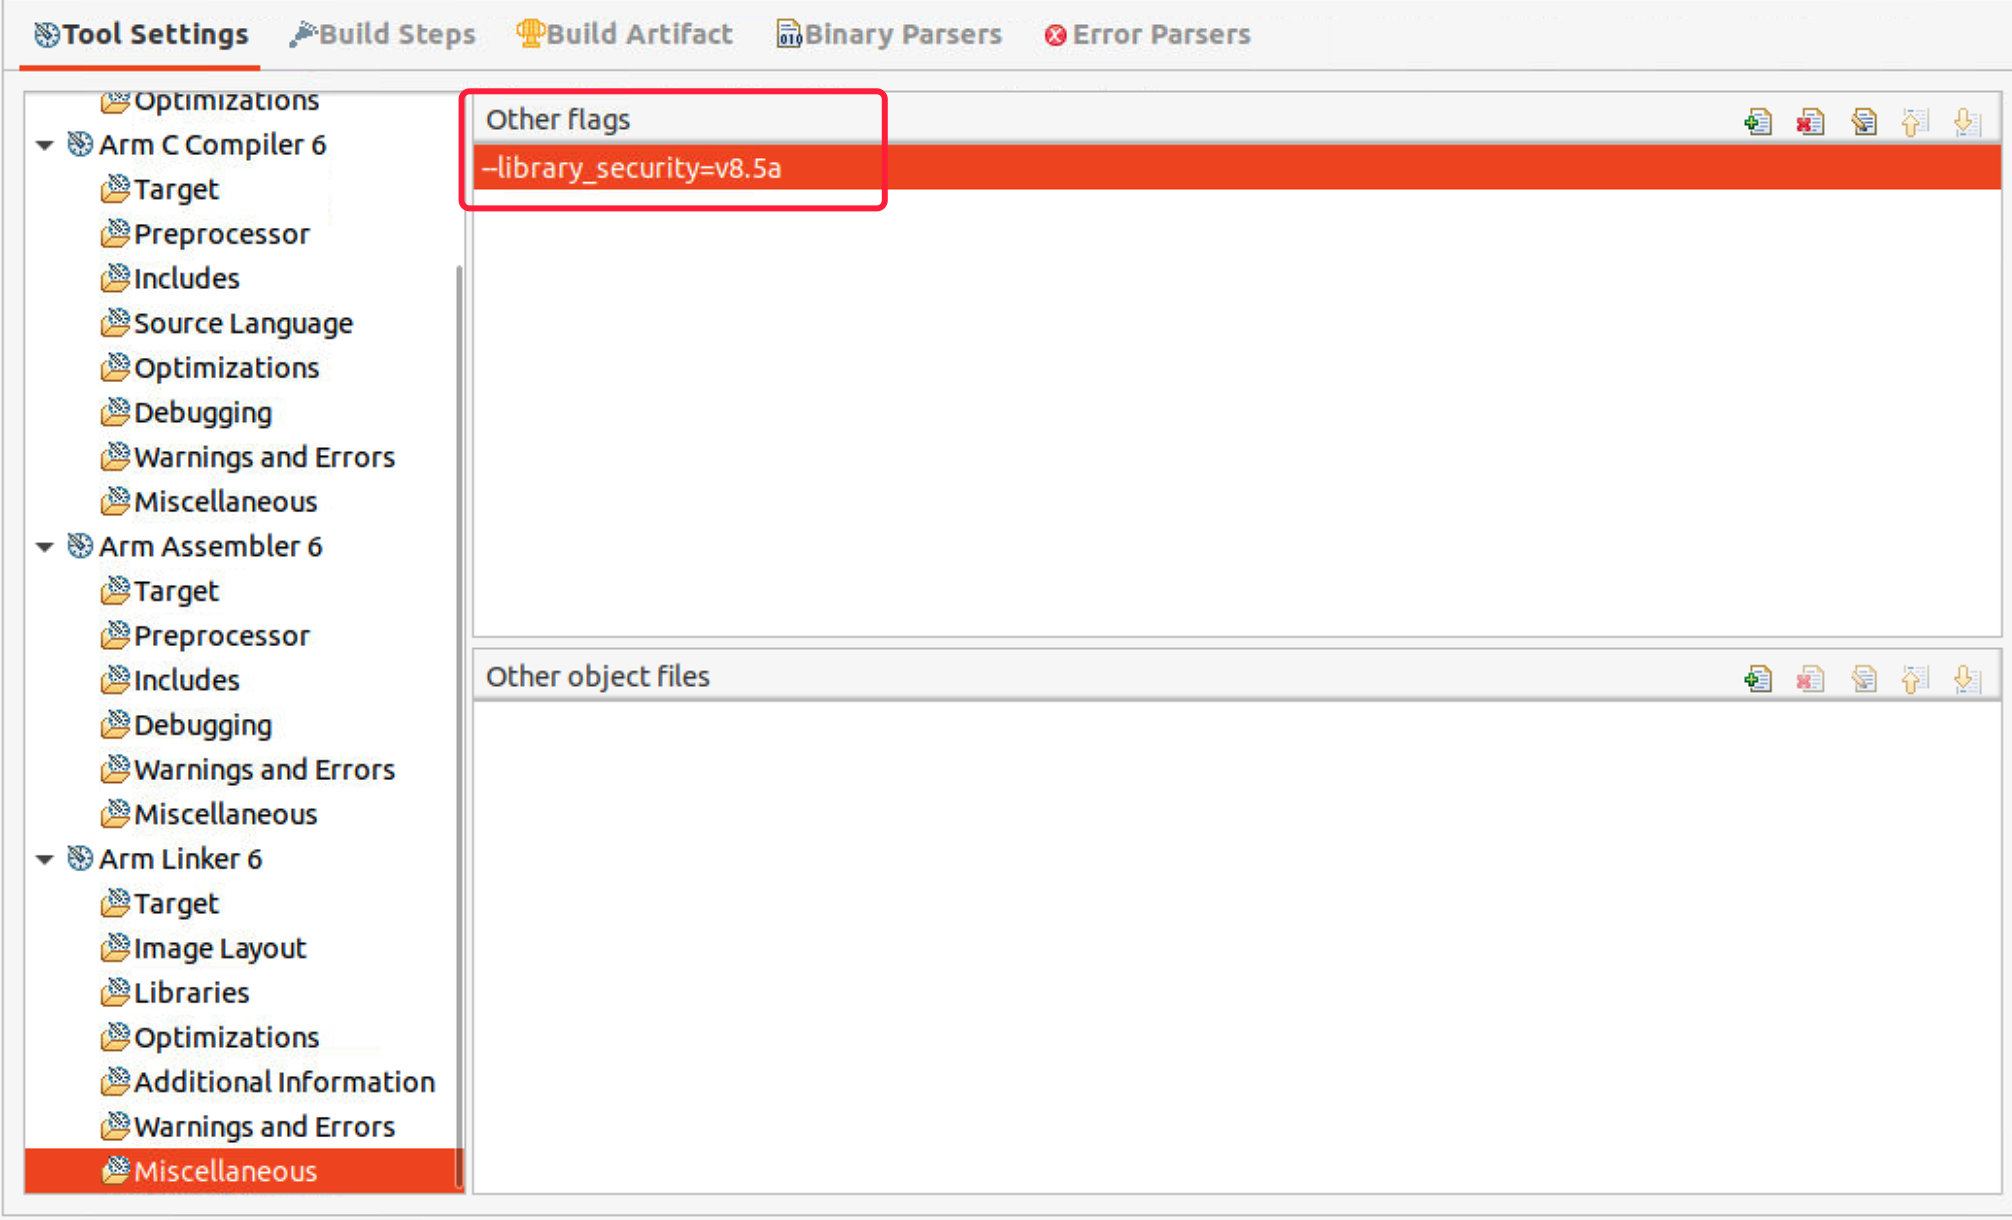
    v8.5 not only provides memory tagging protection of the stack used by the library code, but also branch protection using Branch Target Identification (BTI) and Pointer Authentication Code (PAC). To enable heap protection with memory tagging (malloc, realloc, free..), we need to add code __asm(".global __use_memtag_heap\n\t") in C file.

  2. Build the project, the Debug directory will be generated. When the project has built, in the Project Explorer view, under Debug, locate the HelloWorld.axf file. The .axf file contains the object code and debug symbols that enable Arm Debugger to perform source-level debugging.

  3. Configure a debugging session to launch the FVP and connect to it.

  • Create a use_model_semihostting.ds script to disable semihosting by Arm Debugger.

  • Select File > New > Model Connection, give the connection a name and associate debug connection with an existing project.

  • The FVP Armv8-A Base RevC AEM is not involved by default so we need to add it. Select the model from file system, the path is where you install Armv8-A Base RevC AEM.
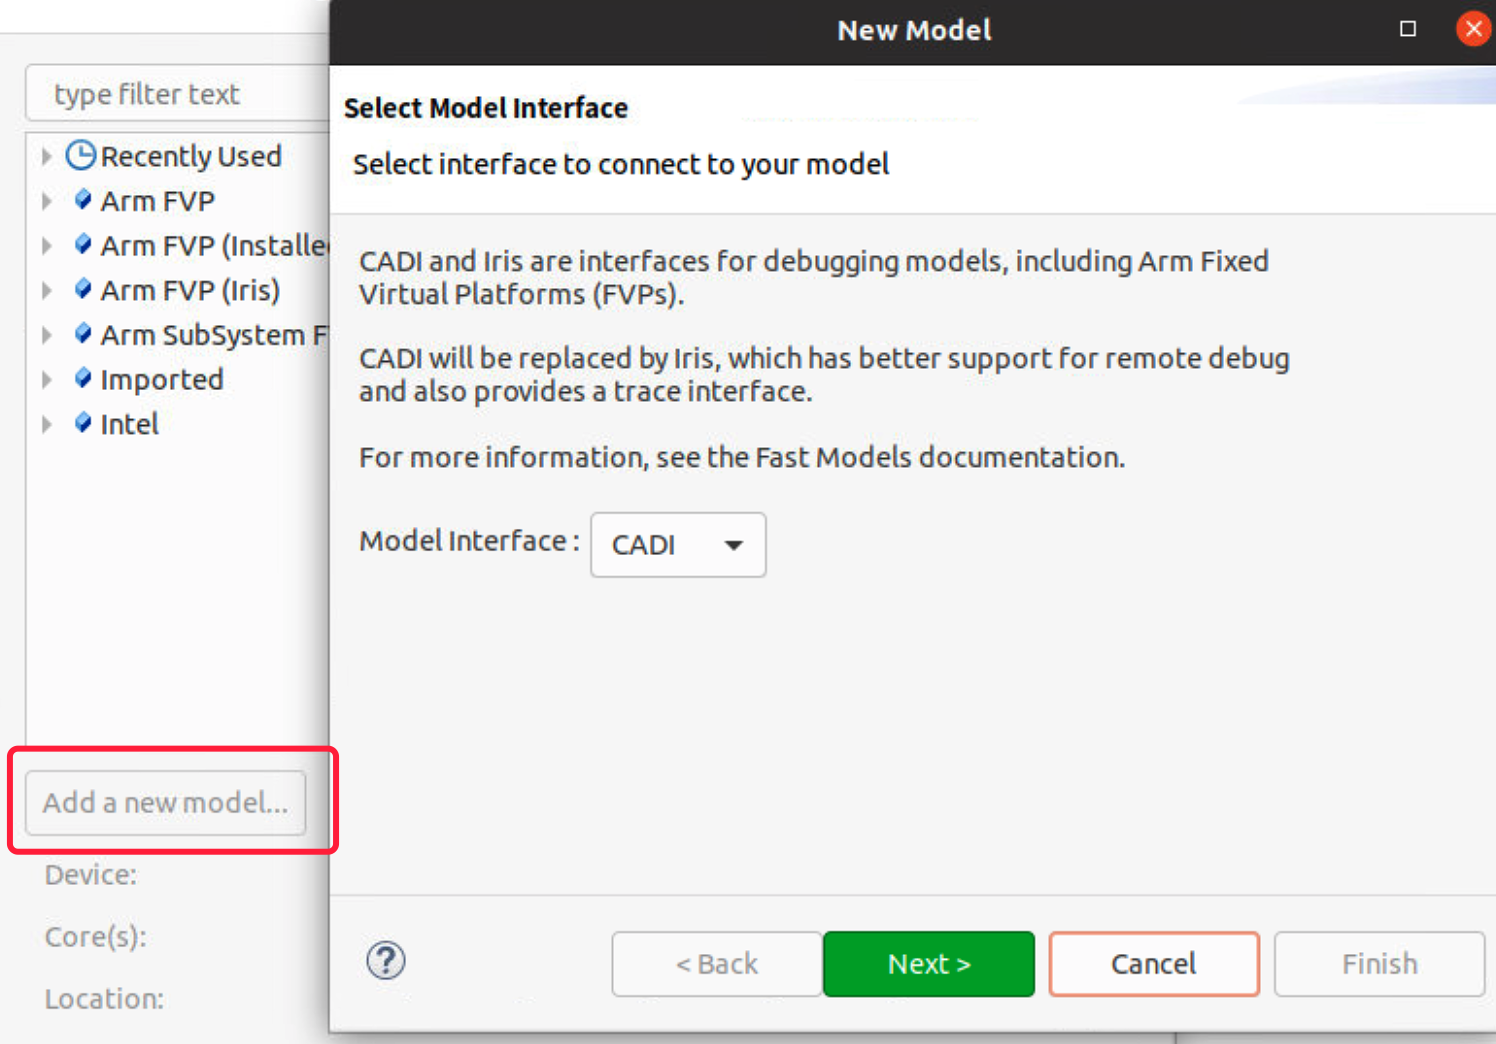
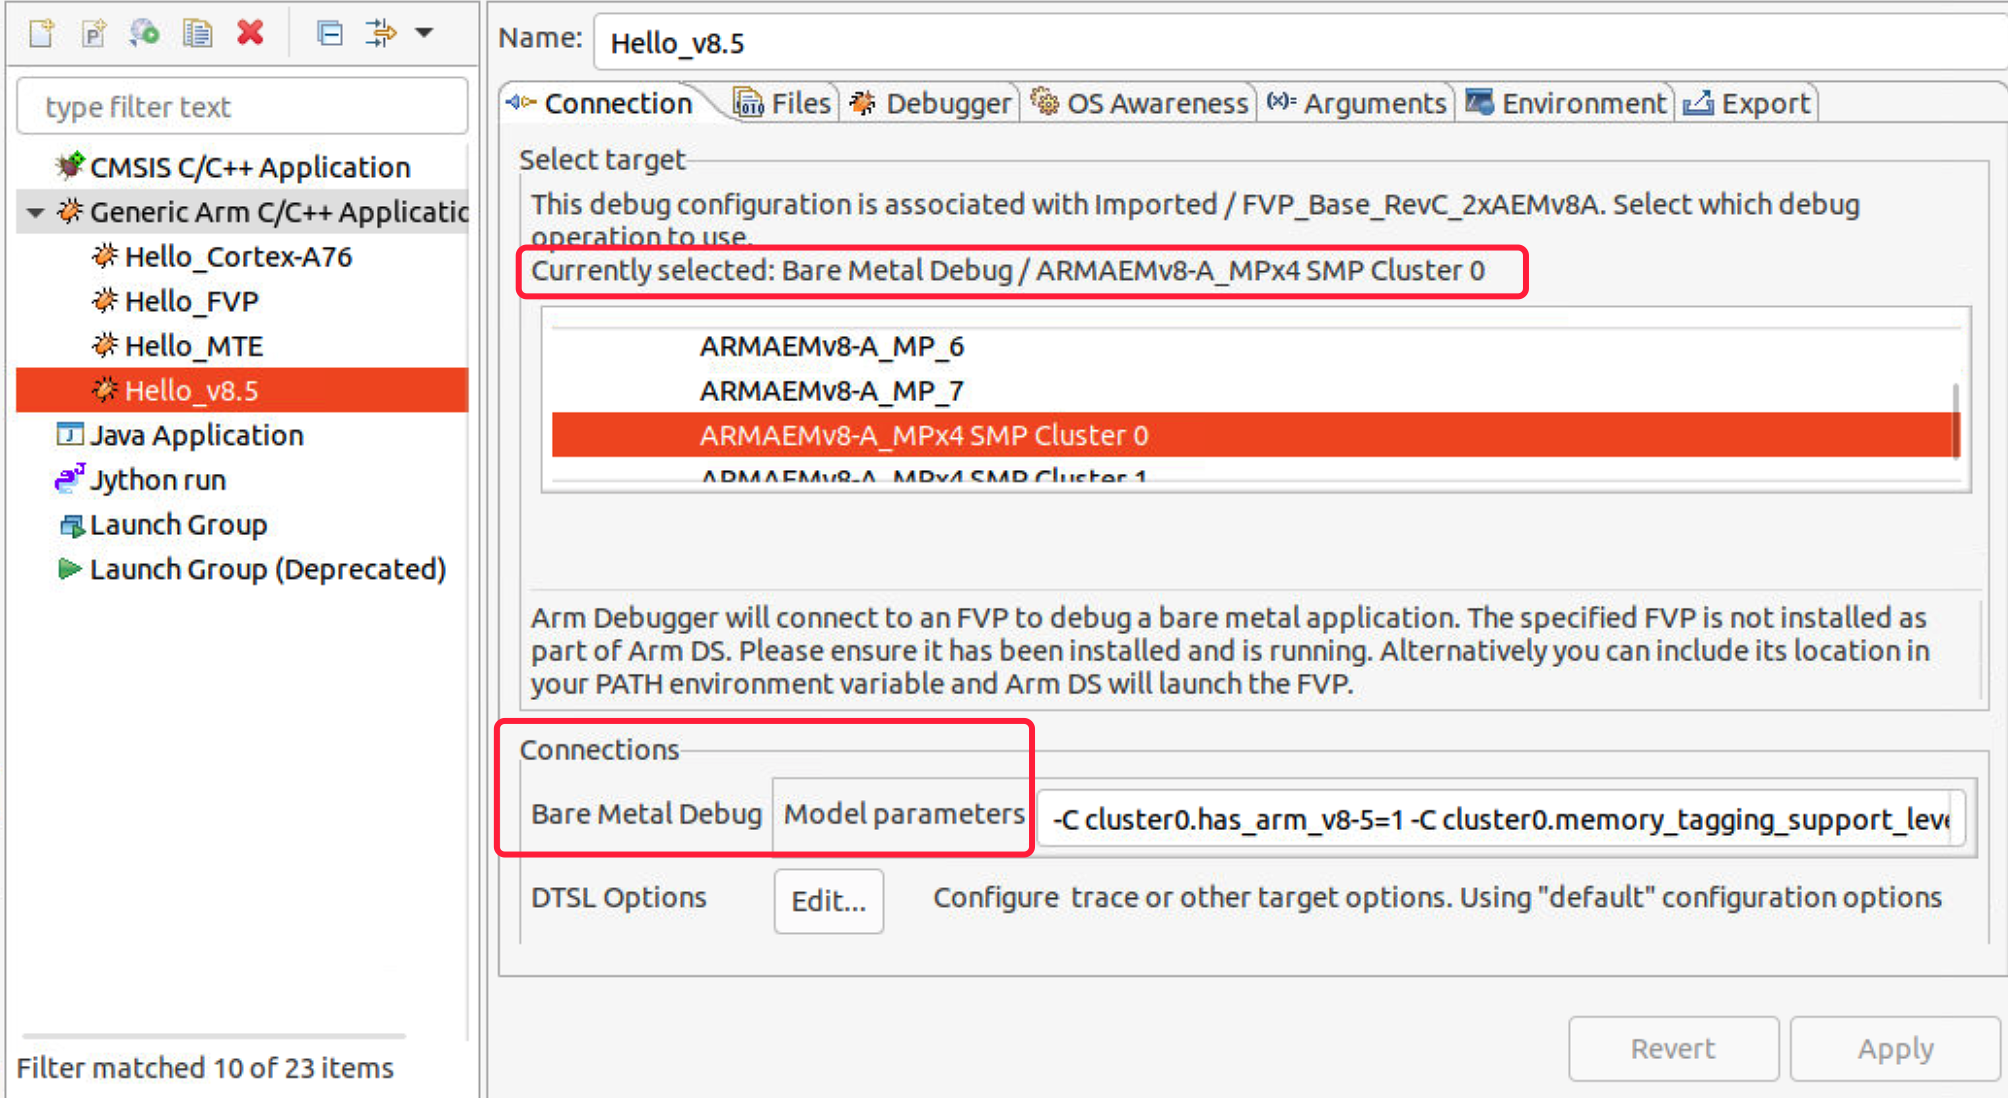
  • Once added, we need to edit the debug configuration. In the Connection tab, select Bare Metal Debug/ARMAEMv8-A_MPx4 SMP Cluster 0.

Add the model parameters as follows to enable MTE support.

1
2
3
4
5
# cluster0.has_arm_v8-5=1 implements the Armv8.5 extension.
# cluster0.memory_tagging_support_level=2 specifies the memory tagging extension support level, 2 means supported at EL0 only.
# bp.dram_metadata.is_enabled=1 lets the memory system to support storing MTE tags.
# bp.secure_memory=false disables the TZC-400 TrustZone memory controller included in the Base_A53x1 FVP. By default, the memory controller refuses all accesses to DRAM memory.
\-C cluster0.has_arm_v8-5=1 -C cluster0.memory_tagging_support_level=2 -C bp.dram_metadata.is_enabled=1 -C bp.secure_memory=false

  • In the Files tab, select .axf file under Debug directory from workspace.

  • In the Debuger tab, select Debug from entry point start64, enable run target initialization debugger script and select .ds script from workspace.

  1. Click Debug to load the application on the target, and load the debug information into the debugger. The application stops at the entry point start64.
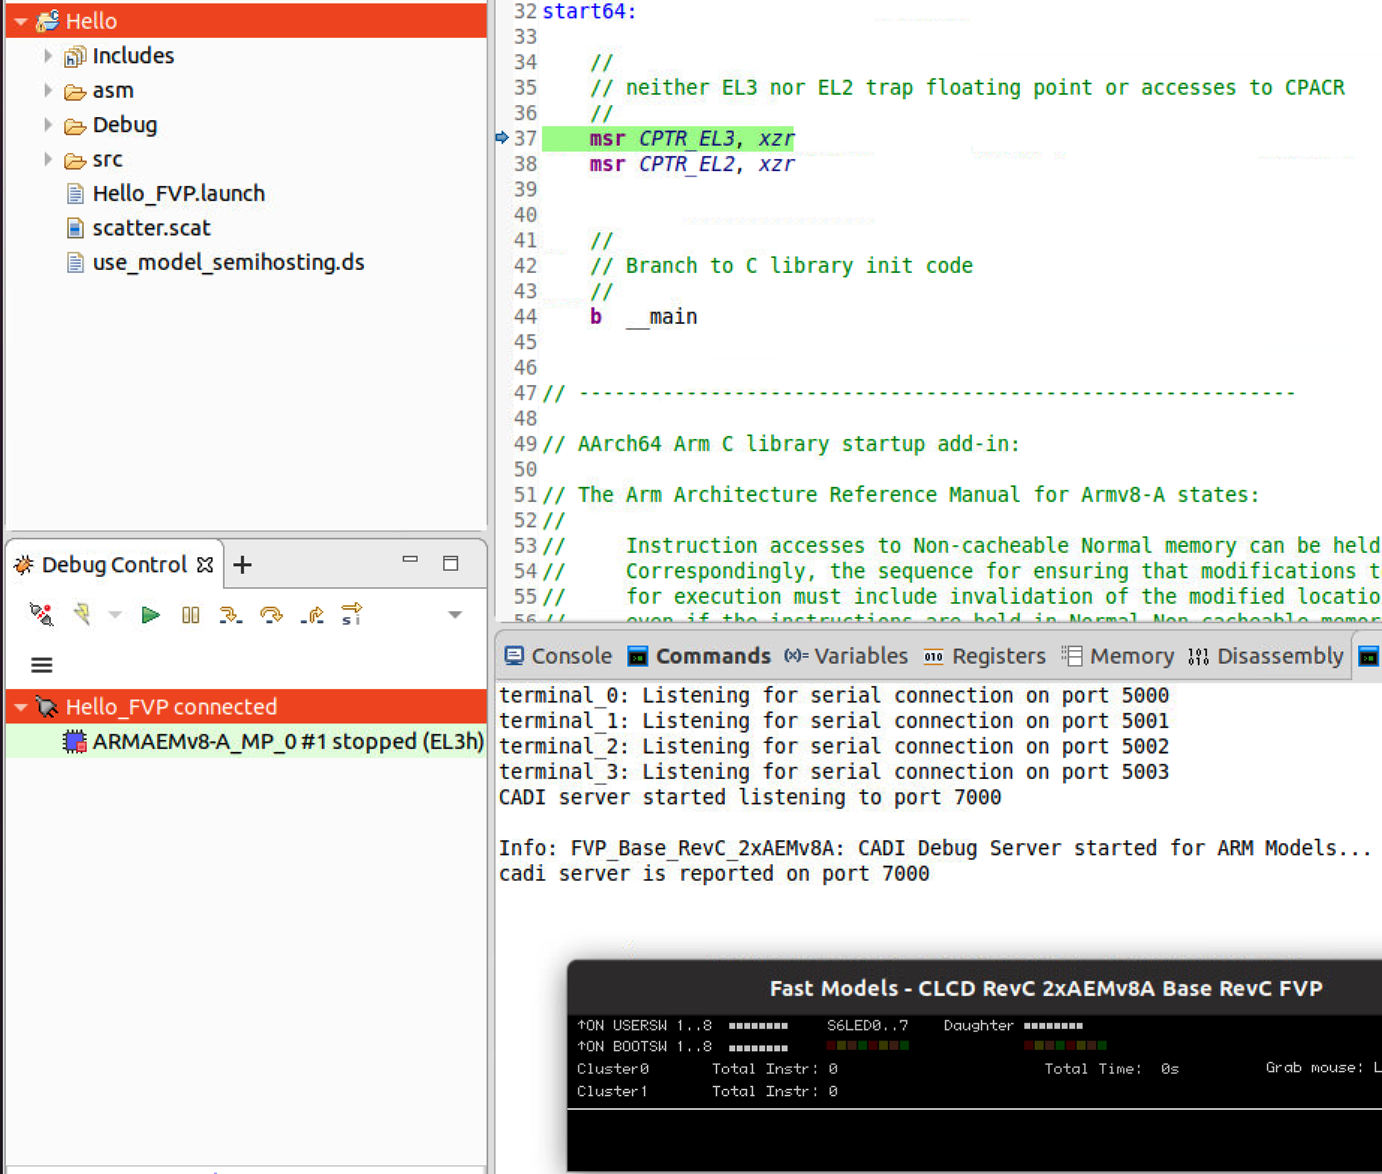
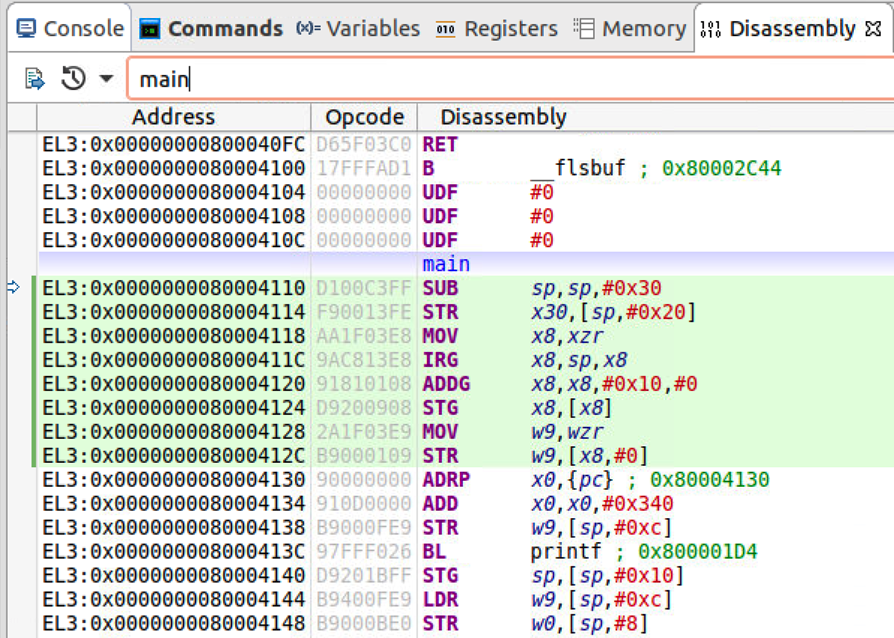
  1. In the disassembly view, we search main to get the assembly instructions of main. The presence of IRG, ADDG shows the code is generated using memory tagging instructions. We set a breakpoint at ADDG instruction, let the program stop at this breakpoint.
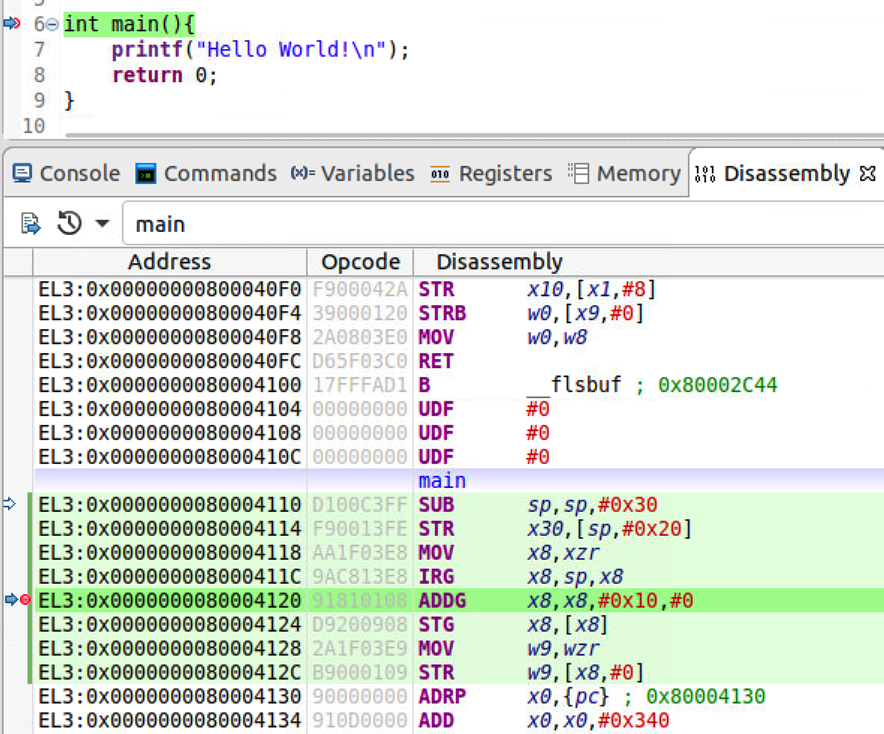
Let the program continue to execute and finally we can see “Hello world!” from target console.

Use-after-free

Reference:

  1. Armv8.5-A Memory Tagging Extension White Paper https://developer.arm.com/-/media/Arm%20Developer%20Community/PDF/Arm_Memory_Tagging_Extension_Whitepaper.pdf

  2. Arm Architecture Registers Manual for Armv8-A Architecture Profile. http://harperchen.qiniudn.com/SysReg_xml_v86A-2020-06.pdf

  3. Arm A64 Instruction Set Architecture Manual for Armv8-A Architecture Profile. http://harperchen.qiniudn.com/ISA_A64_xml_v86A-2020-06_OPT.pdf